Frigidaire ALLFRZKIT Installation Instructions
Frigidaire ALLFRZKIT - Single Freezer Trim Manual
 |
UPC - 012505223594
View all Frigidaire ALLFRZKIT manuals
Add to My Manuals
Save this manual to your list of manuals |
Frigidaire ALLFRZKIT manual content summary:
- Frigidaire ALLFRZKIT | Installation Instructions - Page 1
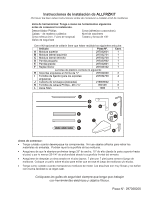
ALLFRZKIT Installation Instructions Please read these instructions thoroughly before beginning to install the trim kit & 1/8" bit You should have received the following items with your collar kit option: Item Part # Qnty A Top Trim 297032601 1 B Left Hand Side Trim 297032701 1 C Right Hand - Frigidaire ALLFRZKIT | Installation Instructions - Page 2
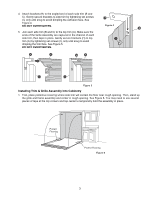
the parts out on a cleared area face down. See Figure 1. E 2. Slide large grille (E) and small grille (D) together. See Figure 2. Make sure ends are flush then tape together to prevent parts from sliding. A 3. Slide grille assembly into top trim(A). See Figure 3. Tape together to prevent parts from - Frigidaire ALLFRZKIT | Installation Instructions - Page 3
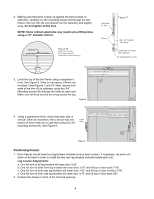
4. Attach brackets (H) to the angled end of each side trim (B and C). Gently secure brackets to side trim by tightening set screws (I), only until snug to avoid dimpling the extrusion face. See Figure 4. DO NOT OVERTIGHTEN. 5. Join each side trim (B and C) to the top trim (A). Make sure the ends of - Frigidaire ALLFRZKIT | Installation Instructions - Page 4
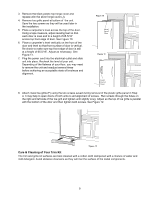
Shim as necessary. Next, secure top and bottom of each side trim to cabinetry using two 3/4" mounting screws (K). See Figure 9. Figure 9 Positioning Freezer 1. Each freezer should have four leg levelers installed (one at each corner). If necessary, lay each unit down on its back in order to install - Frigidaire ALLFRZKIT | Installation Instructions - Page 5
3. Remove the black plastic top hinge cover and replace with the silver hinge cover (J). 4. Remove toe grille panel at surfaces are best cleaned with a cotton cloth dampened with a mixture of water and mild detergent. Avoid abrasive cleansers as they will mar the surface of the metal components. 5 - Frigidaire ALLFRZKIT | Installation Instructions - Page 6
embalaje. Podrían rayar la superficie de las molduras. • Asegúrese de que la abertura preliminar tenga 33" de ancho, 75" de alto (desde la parte superior hasta el piso) y por lo menos 25-1/4" de profundidad desde la superficie frontal del armario. • Asegúrese de despejar un área amplia en el - Frigidaire ALLFRZKIT | Installation Instructions - Page 7
Canaletas HACIA ARRIBA Paño para colocar sobre el piso Figura 1 Cara HACIA ABAJO Agujeros HACIA ARRIBA 1. Coloque las piezas boca abajo en un área despejada. Vea la figura 1. Figura 2 2. Deslice la parrilla grande (E) dentro de la parrilla pequeña (D) para unirlas. Vea la figura 2. Asegúrese de - Frigidaire ALLFRZKIT | Installation Instructions - Page 8
la abertura preliminar. Vea la figura 6. Es posible que tenga que usar varios pedazos de cinta en los ángulos superiores y en el centro de la parte superior, para mantener temporalmente el ensamblaje en su lugar. Proteja el piso Proteja el piso Figura 6 3 - Frigidaire ALLFRZKIT | Installation Instructions - Page 9
de patas delanteros una vuelta completa, la puerta se elevará 3/16", y la parte superior de la misma se inclinará 7/16" hacia atrás. c. Si se hacen de patas traseros una vuelta completa, la puerta descenderá 1/32", y la parte superior de la misma se inclinará 7/16" hacia adelante. d. Si se - Frigidaire ALLFRZKIT | Installation Instructions - Page 10
65-5/16" en toda la longitud del marco superior delantero de la puerta. Vea la figura 10. 6. Coloque verticalmente un nivel de carpintero en la parte delantera de la puerta, y nivele de manera que la superficie frontal de la misma esté vertical. Vuelva a verificar para asegurarse de que el marco - Frigidaire ALLFRZKIT | Installation Instructions - Page 11
d'installation ALLFRZKIT Veuillez lire attentivement ces instructions avant de commencer l'installation du nécessaire de garniture 1 Contenu du sac de plastique : H Supports en cornière en forme de L 297034600 2 I Vis de montage (pour supports en cornière) 297034700 4 J Couvre-charni - Frigidaire ALLFRZKIT | Installation Instructions - Page 12
Rainure vers le HAUT Toile de protection Face vers le BAS Trous vers le HAUT 1. Disposez les pièces face vers le bas sur une surface dégagée. Voyez la figure 1. E 2. Joignez la grande grille (E) et la petite grille (D) ensemble. Voyez la figure 2. Assurez-vous que les extrémités sont au même - Frigidaire ALLFRZKIT | Installation Instructions - Page 13
de la grille sont insérées dans les profils de chaque garniture de côté, puis maintenez-les en place à l'aide de ruban. Fixez soigneusement les supports (H) sur la garniture supérieure (A) en serrant les vis de réglage (I), juste assez pour éviter qu'elles s'enfoncent dans la surface de la garniture - Frigidaire ALLFRZKIT | Installation Instructions - Page 14
2. Assurez-vous que le cadre est au même niveau que la surface avant des armoires avant de faire passer soigneusement les vis de montage (K) à l'intérieur des deux trous de la garniture supérieure (A) jusqu'à ce qu'elles pénètrent l'armoire et qu'elles soient un peu serrées. Ne serrez pas pour l' - Frigidaire ALLFRZKIT | Installation Instructions - Page 15
3. Enlevez le couvre-charnière supérieur en plastique noir et remplacez-le par le couvre-charnière de couleur argent (J). 4. Enlevez le panneau de la grille de protection situé au bas de l'appareil. Conservez les deux vis pour les utiliser ultérieurement durant l'installation. 5. Placez un niveau de
-
 1
1 -
 2
2 -
 3
3 -
 4
4 -
 5
5 -
 6
6 -
 7
7 -
8
-
9
-
10
-
11
-
12
-
13
-
14
-
15
 |
 |
ALLFRZKIT Installation Instructions
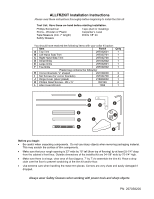
Please read these instructions thoroughly before beginning to install the trim kit.
Tool List: Have these on-hand before starting installation.
Phillips Screwdriver
Tape (duct or masking)
Shims - Wooden or Plastic
Carpenter’s Level
Tape Measure (min. 7’ length)
Drill & 1/8” bit
Safety Glasses
Before you begin:
•
Be careful when unpacking components.
Do not use sharp objects when removing packaging material.
This may scratch the surface of trim components.
•
Make sure that your rough opening is 33" wide by 75" tall (from top of flooring) by at least 25-1/4" deep
from the cabinet’s front face.
Outside dimensions of the installed kit are 3
4
-1/8" wide by 75-1/4" high.
•
Make sure there is a large, clear area of floor (approx. 7’ by 7’) to assemble the trim kit. Place a drop
cloth over the floor to prevent scratching of the trim kit and/or floor.
•
Use extreme care when handling the metal trim pieces. Corners are very sharp and easily damaged if
dropped.
Always wear Safety Glasses when working with power tools and sharp objects.
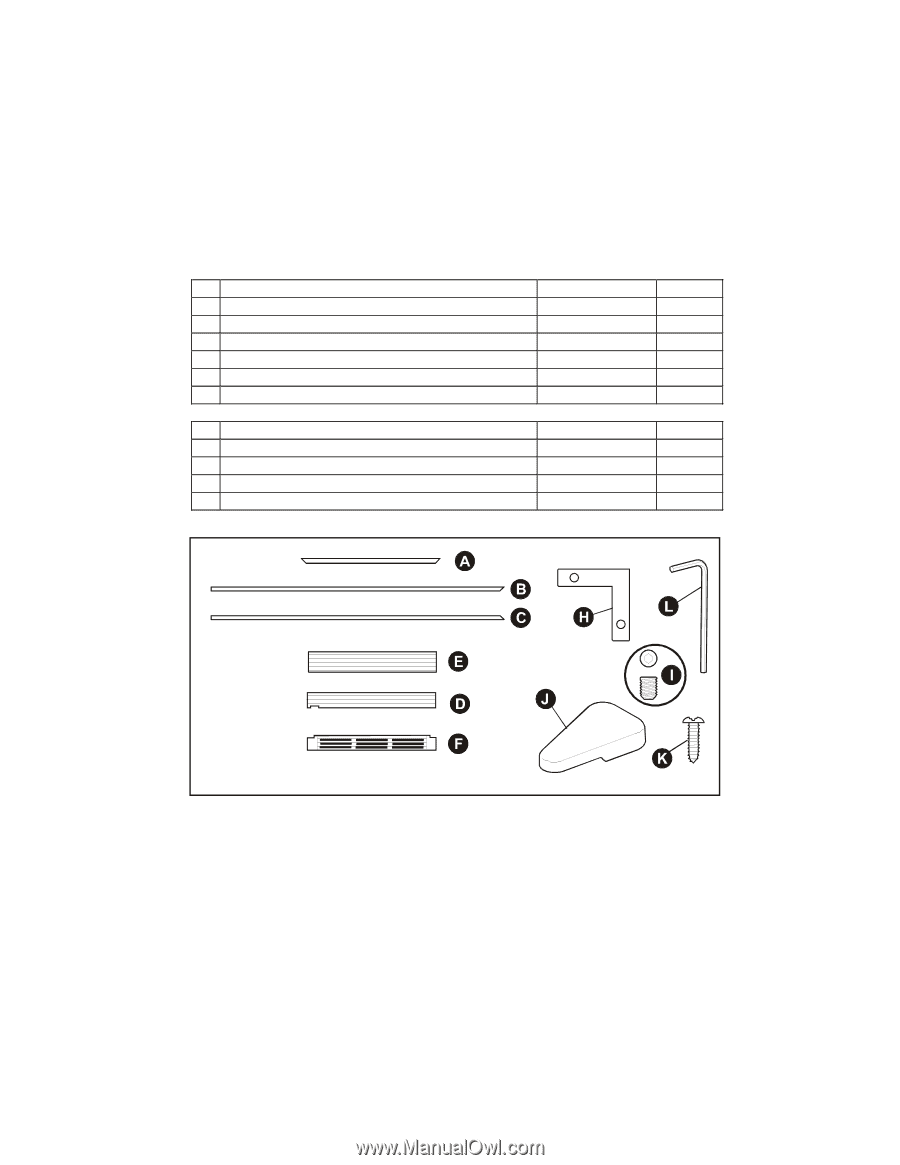
You should have received the following items with your collar kit option:
Item
Part #
Qnty
A
Top Trim
297032601
1
B
Left Hand Side Trim
297032701
1
C
Right Hand Side Trim
297032700
1
D
Small Grille
297032902
1
E
Large Grille
297032801
1
F
Toe Grille
297034502
1
Plastic bag contains the following:
H
Corner Brackets “L” shaped
297034600
2
I
Set Screws (for corner brackets)
297034700
4
J
Hinge Cover (silver plated)
216809002
1
K
Phillips Head Screws - #8 x ¾”
050149
6
L
Allen Head Wrench
1006
1
PN: 297058200