Frigidaire ALLFRZKIT Installation Instructions - Page 1
Frigidaire ALLFRZKIT - Single Freezer Trim Manual
 |
UPC - 012505223594
View all Frigidaire ALLFRZKIT manuals
Add to My Manuals
Save this manual to your list of manuals |
Page 1 highlights
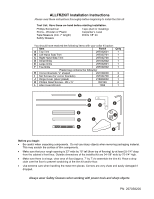
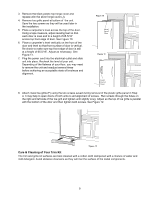
ALLFRZKIT Installation Instructions Please read these instructions thoroughly before beginning to install the trim kit. Tool List: Have these on-hand before starting installation. Phillips Screwdriver Shims - Wooden or Plastic Tape Measure (min. 7' length) Safety Glasses Tape (duct or masking) Carpenter's Level Drill & 1/8" bit You should have received the following items with your collar kit option: Item Part # Qnty A Top Trim 297032601 1 B Left Hand Side Trim 297032701 1 C Right Hand Side Trim 297032700 1 D Small Grille 297032902 1 E Large Grille 297032801 1 F Toe Grille 297034502 1 Plastic bag contains the following: H Corner Brackets "L" shaped 297034600 2 I Set Screws (for corner brackets) 297034700 4 J Hinge Cover (silver plated) 216809002 1 K Phillips Head Screws - #8 x ¾" 050149 6 L Allen Head Wrench 1006 1 Before you begin: • Be careful when unpacking components. Do not use sharp objects when removing packaging material. This may scratch the surface of trim components. • Make sure that your rough opening is 33" wide by 75" tall (from top of flooring) by at least 25-1/4" deep from the cabinet's front face. Outside dimensions of the installed kit are 34-1/8" wide by 75-1/4" high. • Make sure there is a large, clear area of floor (approx. 7' by 7') to assemble the trim kit. Place a drop cloth over the floor to prevent scratching of the trim kit and/or floor. • Use extreme care when handling the metal trim pieces. Corners are very sharp and easily damaged if dropped. Always wear Safety Glasses when working with power tools and sharp objects. PN: 297058200
-
 1
1 -
 2
2 -
 3
3 -
 4
4 -
 5
5 -
 6
6 -
 7
7 -
8
-
9
-
10
-
11
-
12
-
13
-
14
-
15
 |
 |