Frigidaire ALLFRZKIT Installation Instructions - Page 4
Positioning Freezer
 |
UPC - 012505223594
View all Frigidaire ALLFRZKIT manuals
Add to My Manuals
Save this manual to your list of manuals |
Page 4 highlights
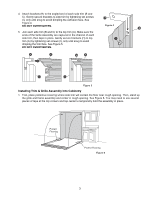
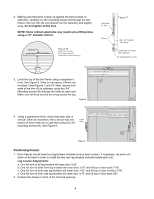
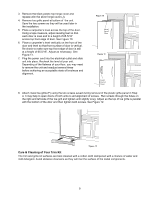
2. Making sure the frame is flush up against the front surface of cabinetry, carefully run the mounting screws (K) through the two holes in the top trim (A) until started into the cabinetry and slightly snug. Do not tighten at this time. NOTE: Some cabinet substrates may require pre-drilling holes using a 1/8" diameter drill bit. Figure 7A (taken from inside the rough opening; backside of grille showing) Back side of Trim Figure 7 Shims Min. 3/4" Cabinet Side Panel Install Side Trim flush with cabinetry 3/4" Mounting Screw (K) 3. Level the top of the trim frame using a carpenter's Level level. See Figure 8. Shim as necessary. (Shims not Top included.) See Figures 7 and 7A. Next, secure both ends of top trim (A) to cabinetry using two 3/4" Mounting screws (K) through the holes at each end. Make sure all three screws are snug across the top. Figure 8 4. Using a carpenter's level, check that each side is vertical. Shim as necessary. Next, secure top and bottom of each side trim to cabinetry using two 3/4" mounting screws (K). See Figure 9. Figure 9 Positioning Freezer 1. Each freezer should have four leg levelers installed (one at each corner). If necessary, lay each unit down on its back in order to install the two rear leg levelers included inside each unit. Leg Leveler Adjustments: a. One full turn of all leg levelers will raise door 5/32". b. One full turn of both front leg levelers will raise door 3/16" and tilt top of door back 7/16". c. One full turn of both rear leg levelers will lower door 1/32" and tilt top of door forward 7/16". d. One full turn of both side leg levelers will raise door 3/16" and tilt top of door back 3/8". 2. Position the freezer in front of the trimmed opening. 4
-
 1
1 -
 2
2 -
 3
3 -
 4
4 -
 5
5 -
 6
6 -
 7
7 -
 8
8 -
 9
9 -
 10
10 -
11
-
12
-
13
-
14
-
15
 |
 |
