Frigidaire ALLFRZKIT Installation Instructions - Page 5
Care & Cleaning of Your Trim Kit
 |
UPC - 012505223594
View all Frigidaire ALLFRZKIT manuals
Add to My Manuals
Save this manual to your list of manuals |
Page 5 highlights
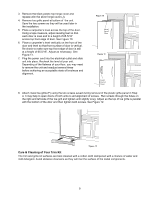
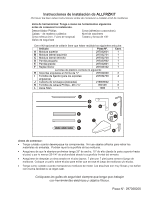
3. Remove the black plastic top hinge cover and replace with the silver hinge cover (J). 4. Remove toe grille panel at bottom of the unit. Save the two screws as they will be used later in the installation. 5. Place a carpenter's level across the top of the door. Using a tape measure, adjust leveling feet so that each door is level and to a height of 65-5/16" across top front edge of door. See Figure 10. 6. Place a carpenter's level vertically on the front of the door and level so that front surface of door is vertical. Re-check to make sure top front edge of door is still at a height of 65-5/16". Adjust as necessary. See Figure 11. 7. Plug the power cord into the electrical outlet and slide unit into place. Recheck the level of your unit. Depending of the flatness of your floor, you may need to remove the unit and readjust several times before achieving an acceptable state of levelness and alignment. Figure 10 Level Top of Door Figure 11 Level Front of Door 8. Attach metal toe grille (F) using the two screws saved during removal of the plastic grille panel in Step 4. It may help to open doors of both units to aid alignment of screws. Run screws through the holes on the right and left side of the toe grill and tighten until slightly snug. Adjust so the top of toe grille is parallel with the bottom of the door and then tighten both screws. See Figure 12. Figure 12 Care & Cleaning of Your Trim Kit The trim and grille kit surfaces are best cleaned with a cotton cloth dampened with a mixture of water and mild detergent. Avoid abrasive cleansers as they will mar the surface of the metal components. 5
-
 1
1 -
 2
2 -
 3
3 -
 4
4 -
 5
5 -
 6
6 -
 7
7 -
 8
8 -
 9
9 -
 10
10 -
 11
11 -
12
-
13
-
14
-
15
 |
 |
