Frigidaire FAH106S1T Installation Instructions - Page 10
Westinghouse/Frigidaire
 |
UPC - 012505273063
View all Frigidaire FAH106S1T manuals
Add to My Manuals
Save this manual to your list of manuals |
Page 10 highlights
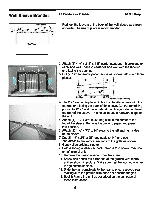
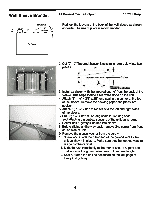
Wall Sleeve Brands: 44 #8 White Westinghouse/Frigidaire/ Carrier 52F Series 161? + 17 14., Deep 1. If the wall sleeve does not have a rear grille or louvered panel, install the plastic grille from the kit. The plastic grille is mounted to the inside of the wall sleeve at the rear flanges. There are (4) plastic nuts in the flanges of the wall sleeve. If some are missing replacements are included in the accessory kit, and can be simply pressed into the square holes in the flanges. Place the grille against the rear flanges and use the (4) large washers and screws to secure the grille. 3. IV 2. Attach (1) 1 Y2" x 3/8" x 25" long seal in the center at the top of the sleeve. Remove the backing paper and press into position. 3. Attach (2) 1 3/2" x 3/8" x 14" seals to the left and right sides of the sleeve. 4. Attach (1) 1" x x14" long seal vertically 3.5" from the left side of the sleeve. Attach the other 1" x 4/4"x 14" long seal 3" from the right side of the sleeve 5. Center unit & gently slide unit into sleeve. 6. Before sliding all-the-way back, remove 2nd screw from front on left side of unit. 7. Remove the plastic washer from the screw. 8. Screw and attach the other end of the ground wire to the unit as shown in picture. Make sure that the toothed washer is against the cabinet. 9. Slide the unit completely to the rear to ensure a good seal, making sure the ground wire does not become tangled. 10. Seal & Frame the unit as described on the last page of these instructions. 10
-
 1
1 -
2
-
3
-
4
-
 5
5 -
 6
6 -
 7
7 -
 8
8 -
 9
9 -
 10
10 -
 11
11 -
 12
12
 |
 |
