Frigidaire FAQ055S7A Installation Instructions - Page 5
Attach, Curtains, Window, Frame
 |
View all Frigidaire FAQ055S7A manuals
Add to My Manuals
Save this manual to your list of manuals |
Page 5 highlights
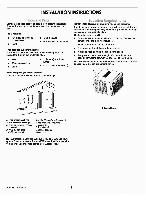
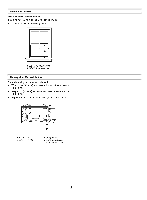
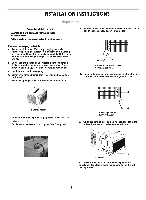
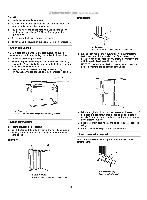
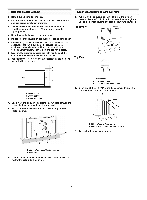
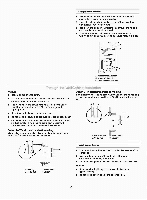
Install Cabinet into Window Attach Side Curtains to Window Frame • Handle the air conditioner gently. • Be sure your air conditioner cabinet does not fall out of the opening during installation or removal. • The place where the power cord exits the air conditioner should be no more than 4 ft (122 cm) from a grounded 3 prong outlet • Do not block the louvers on the front panel. • Do not block the louvers on the outside of the air conditioner, 1. Center empty cabinet in window. Check that lower rail of air conditioner cabinet is behind and against back side of windowsill. Maintain a firm hold on the air conditioner cabinet. Lower window sash to hold the cabinet in place. 2. Measure the distance between the right-hand side of the cabinet and the inside of the window channel. 3. Repeat for the left side. Adjust the cabinet until the distance on each side is the same. 1. Pull the left-hand curtain out until it fits into the window channel. Use a %2' drill bit to drill a starter hole through the hole in the curtain housing and into the lower window sash. Front View Top View A B -C A. Window sash B. Empty cabinet C. Window channel 4. Use a 3116" drill bit to drill 2 starter holes W deep through the 2 holes in the cabinet and into the windowsill. 5. Attach cabinet to windowsill with 2 - #10 x 1/2' pan-head Phillips screws. A. Window channel B. Left-hand curtain C. #10x 34/ ' round-head screw 2. Insert one of the #10 x 34/ ' round -head screws through the threaded hole in the top of the curtain. A B- *11 A A. #lox W round-head screw B. Slotted hole in the bottom of the curtain 3. Repeat for the right-hand curtain. B A. 010 x W pan-head Phillips screws B. Windowsill 6. Check that air conditioner cabinet is tilted to the outside so that water will run to the outside. 5
-
 1
1 -
 2
2 -
 3
3 -
 4
4 -
 5
5 -
 6
6 -
 7
7 -
 8
8
 |
 |
