Frigidaire FF03DISPC1 Complete Owners Guide - Page 3
Important, Caution
 |
View all Frigidaire FF03DISPC1 manuals
Add to My Manuals
Save this manual to your list of manuals |
Page 3 highlights
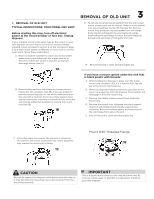
1. REMOVAL OF OLD UNIT TYPICAL INSTRUCTIONS, YOUR MODEL MAY VARY. Before starting this step, turn off electrical power at the circuit breaker or fuse box. Unplug disposer. If your installed mount is the same type as the mount on your new disposer and you wish to continue to use the already installed mount, proceed to section 3 on the Connection page. If your new mount system is different or if you wish to use the new mount, follow these instructions: A. Have a container available to catch any excess water/ waste from current disposer. Use a pipe wrench to disconnect drain line where it attaches to disposer discharge elbow (see 1A). 1A B. Remove disposer from sink flange by turning mount ring to the left clockwise (see 1B). If you are unable to turn the mount ring, tap on one of the extensions from the ring with a hammer. Some mounting systems have tubular extensions. Inserting a screwdriver into one tube will provide additional leverage for turning the mount ring (see 1B). 1B 3 REMOVAL OF OLD UNIT D. To remove remaining mount system from the sink, loosen mount screws, push mount ring up. Under it is the retainer ring. Use screwdriver to pop off ring (see 1D). Remove mount ring, protector ring and gasket from sink flange. Some mounts will require the unscrewing of a large ring holding the sink flange in place. Pull sink flange up through sink and clean off old putty from sink. 1D E. Ensure that sink is clean and thoroughly dry. If you have a mount system under the sink that is black plastic with threads: A. While holding the disposer in place, turn the metal mount ring clockwise (1E). If it is hard to turn, tap the ear of the mount ring clockwise. B. When the disposer hopper projections get close to the mount ring opening, hold the disposer from bottom and disengage it from the mount ring. C. Remove the rubber cushion mount from under the mount ring. D. Remove the mount ring. Unthread the black support ring from sink flange by turning the support ring clockwise. Remove the fiber gasket and then remove the sink flange from above the sink. E. Ensure that sink is clean and thoroughly dry. C. Some disposers may require the removal or loosening of nuts from the mount screws (see 1C). Some disposers may require the removal of a clamp. 1C Mount With Threaded Flange 1E CAUTION Be sure to support the disposer while performing this step or it may fall when the mounting ring is disconnected from the mounting assembly. IMPORTANT This is a good time to clean out the trap and drain lines by running a drain auger or plumber's snake before installing your new disposer.
-
 1
1 -
 2
2 -
 3
3 -
 4
4 -
 5
5 -
 6
6 -
 7
7 -
 8
8 -
 9
9 -
10
-
11
-
12
-
13
-
14
-
15
 |
 |
