Frigidaire FHWC3655LS Complete Owner's Guide (English) - Page 7
Important
 |
View all Frigidaire FHWC3655LS manuals
Add to My Manuals
Save this manual to your list of manuals |
Page 7 highlights
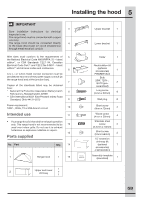
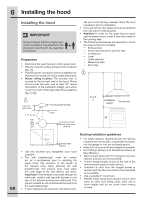
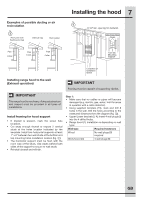
Examples of possible ducting or air recirculation fig. Roof pitch with flashing and cap Sidewall cap Recirculator Pipe Collar Pipe Collar Pipe Collar Installing the hood 7 fig. Installing range hood to the wall (Exhaust operation) IMPORTANT Framing must be capable of supporting 100 lbs. IMPORTANT This range hood is very heavy. Adequate structure and support must be provided in all types of installations. Install framing for hood support • If drywall is present, mark the screw hole locations. • Cut away enough drywall to expose 2 vertical studs at the holes location indicated by the template. Install two horizontal supports at least 1" x 6" between two wall studs at the bottom and top mounting holes installation location (fig. ). • The horizontal support must be flush with the room side of the studs. Use cleats behind both sides of the support to secure to wall studs. • Reinstall drywall and refinish. Step 1: • Make sure that no cables or pipes will become damaged (e.g. electric, gas, water; test the areas in question with a cable detector). • Using supplied template (15), mark and drill 8 holes in the wall. Drill the holes according to the measured distances from the diagram (fig. ). • Upper/Lower bracket (3, 4): Insert 4 wall plugs (9) into the 4 drilled holes. • Range hood (1): Installation is depending on wall type: Wall type Required fasteners Wood No wall plugs (9) required Brick/Concrete 4 wall plugs (9) GB
-
 1
1 -
 2
2 -
 3
3 -
 4
4 -
 5
5 -
 6
6 -
 7
7 -
 8
8 -
 9
9 -
 10
10 -
 11
11 -
 12
12 -
13
 |
 |
