Frigidaire FHWC3655LS Complete Owner's Guide (English) - Page 8
Desired range hood distance above a, high cook top
 |
View all Frigidaire FHWC3655LS manuals
Add to My Manuals
Save this manual to your list of manuals |
Page 8 highlights
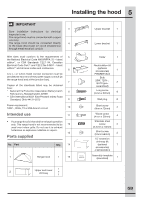
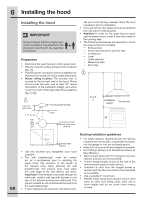
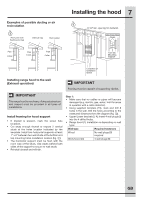
8 Installing the hood fig. Long screws Ceiling 2.95" 5.1" 0.86" Wood screws 15.67" 5.9" 8.3" 1.5" 15.98"-FHWC3055L 23.86"-FHWC3655L Wall Dimension A (see table) • Insert 2 screws (8 or 11) in the top location, but do not fully insert the screws (fig. ). Mount the range hood (1) to the wall and tighten the screws. Insert and tighten the 2 remaining screws on the bottom location of the range hood (fig. / ). • Attach the collar (5) to the range hood (1). Secure with 2 short screws (8) (fig. ). fig. fig. 0.08" fig. fig. 0.08" GB Desired range hood distance above a 36" high cook top Ceiling height 8 Feet 9 Feet A*2 A*2 26"*3 27-5/16" 27"*3 28-5/16" 28-5/16" 28"*3 29-5/16" 29-5/16" 29"*3 30-5/16"*4 30-5/16" 30"*3 31-5/16"*4 31-5/16" 31"*3 32-5/16"*4 32-5/16" 32"*3 33-5/16"*4 33-5/16" 33" 34-5/16" 34" 35-5/16" 35" 36-5/16" 10 Feet *1 A*2 29-5/16" 30-5/16" 31-5/16" 32-5/16" 33-5/16" 34-5/16" 35-5/16" 36-5/16" NOTE Sometimes, sponge tape covers the holes. If the holes are located behind the sponge tape, simply insert the screw through the sponge tape. Step 3: • Mount upper and lower brackets (3, 4) on the wall. Secure with the remaining 4 sets of long screws (8). The notches of the lower bracket should be facing up towards the ceiling (fig. ). • Attach the exhaust duct. In the example below a round metal duct furnace pipe has been used. The airtight connection of the exhaust duct should then be improved with a duct tape. This ensures tight fit and that no grease vapors will escape from the duct (fig. ). *1: with 10' extension chimney kit FW10EX55LS fig. fig. (14) (not supplied). Please call Frigidaire at 1.800.944.9044 to order this kit. *2: "Dimension A" in the chart represents the height from cook top to where the bottom screw mounting holes would be located. *3: Recommended mounting height *4: Recirculation Kit cannot be installed. Step 2: • Install the range hood (1) either with wood screws or long screws, depending on the wall type: Wall type Required screws Wood 4 wood screws (11) Brick/Concrete 4 long screws (8)
-
 1
1 -
2
-
 3
3 -
 4
4 -
 5
5 -
 6
6 -
 7
7 -
 8
8 -
 9
9 -
 10
10 -
 11
11 -
 12
12 -
 13
13
 |
 |
