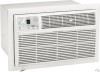
Frigidaire GAH12ER2T Installation Instructions - Page 6
Sears or Carrier 51S Series
 |
UPC - 012505272431
View all Frigidaire GAH12ER2T manuals
Add to My Manuals
Save this manual to your list of manuals |
Page 6 highlights
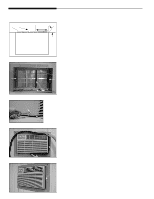
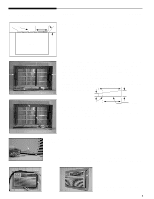
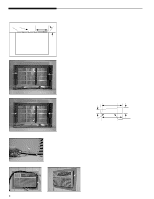
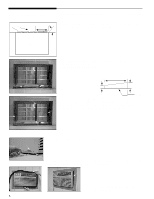
Wall Sleeve Brands: #5 Sears or Carrier (51S Series) 185⁄8"Deep Rear Louvers 60° 1. Redirect the louvers at the back of the wall sleeve as shown in the 10" illustration. The use of pliers is recommended. 60° 9-1/2" Top View ← 10"‹ → 2. Attach (2) Tapered Spacer Blocks to the inside of the wall sleeve as shown in the illustration. DO NOT CUT THESE BLOCKS. ← 61⁄2"‹→ 2 3 3 17" ← 61⁄2"‹→ 3 1" 3/4" Tapered Spacer Block 13" Protection Paper Backing 3. Attach the (1) 11⁄2"x 3/8"x 261⁄2"long seals and the (2) 11⁄2"x 3/8"x 14'long seals as shown in the illustration. 4. Attach the 1'x 3/4"x 14"long seal to inside of the louvered panel as shown in the illustration. Install the new unit into the wall sleeve. 4 5. Attach the ground wire to the unit as shown. 5 6. Install the 1"x 11⁄2"x 84"long stuffer seal between the wall sleeve and the unit. A flat bladed screwdriver or putty knife is recommended. 6 6 7. Assemble and install the Trim Frame. (see Trim Frame) 6
-
 1
1 -
 2
2 -
 3
3 -
 4
4 -
 5
5 -
 6
6 -
 7
7 -
 8
8 -
 9
9 -
 10
10 -
 11
11
 |
 |
