Garmin Forerunner 265 Owners Manual - Page 65
Viewing Course Details, Saving Your Location, Viewing and Editing Your Saved Locations
 |
View all Garmin Forerunner 265 manuals
Add to My Manuals
Save this manual to your list of manuals |
Page 65 highlights
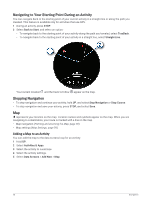
Viewing Course Details You can view course details before you navigate a course. 1 Press START. 2 Select an activity. 3 Hold UP. 4 Select Navigation > Courses. 5 Press START to select a course. 6 Select an option: • To begin navigation, select Do Course. • To create a custom pace band, select PacePro. • To view the course on the map and pan or zoom the map, select Map. • To begin the course in reverse, select Do Course in Reverse. • To view an elevation plot of the course, select Elevation Plot. • To change the course name, select Name. • To delete the course, select Delete. Saving Your Location You can save your current location to navigate back to it later. NOTE: You can add options to the controls menu (Customizing the Controls Menu, page 35). 1 Hold LIGHT. 2 Select Save Location. 3 Follow the on-screen instructions. Viewing and Editing Your Saved Locations TIP: You can save a location from the controls menu (Controls, page 32). 1 Press START. 2 Select an activity. 3 Hold UP. 4 Select Navigation > Saved Locations. 5 Select a saved location. 6 Select an option to view or edit the location details. Navigating to a Destination You can use your device to navigate to a destination or follow a course. 1 Press START. 2 Select an activity. 3 Hold UP. 4 Select Navigation. 5 Select a category. 6 Respond to the on-screen prompts to choose a destination. 7 Select Go To. Navigation information appears. 8 Press START to begin navigation. Navigation 57
-
 1
1 -
2
-
3
-
4
-
5
-
6
-
7
-
8
-
9
-
10
-
11
-
12
-
13
-
14
-
15
-
16
-
17
-
18
-
19
-
20
-
21
-
22
-
23
-
24
-
25
-
26
-
27
-
28
-
29
-
30
-
31
-
32
-
33
-
34
-
35
-
36
-
37
-
38
-
39
-
40
-
41
-
42
-
43
-
44
-
45
-
46
-
47
-
48
-
49
-
50
-
51
-
52
-
53
-
54
-
55
-
56
-
57
-
58
-
59
-
 60
60 -
 61
61 -
 62
62 -
 63
63 -
 64
64 -
 65
65 -
 66
66 -
 67
67 -
 68
68 -
 69
69 -
 70
70 -
71
-
72
-
73
-
74
-
75
-
76
-
77
-
78
-
79
-
80
-
81
-
82
-
83
-
84
-
85
-
86
-
87
-
88
-
89
-
90
-
91
-
92
-
93
-
94
-
95
-
96
-
97
-
98
-
99
-
100
-
101
-
102
-
103
-
104
-
105
-
106
-
107
-
108
-
109
-
110
-
111
-
112
-
113
-
114
-
115
-
116
-
117
-
118
-
119
-
120
-
121
-
122
 |
 |