Garmin GPSMAP 64csx Owners Manual - Page 6
Installing AA Batteries, Turning On the Device, Acquiring Satellite Signals, Opening the Main Menu
 |
View all Garmin GPSMAP 64csx manuals
Add to My Manuals
Save this manual to your list of manuals |
Page 6 highlights
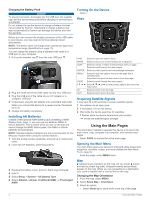
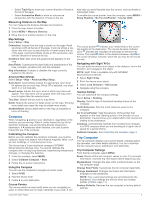
Charging the Battery Pack NOTICE To prevent corrosion, thoroughly dry the USB port, the weather cap, and the surrounding area before charging or connecting to a computer. Do not attempt to use the device to charge a battery that was not provided by Garmin®. Attempting to charge a battery that was not provided by Garmin can damage the device and void the warranty. Before you can connect the straight connector of the USB cable to your device, you may need to remove optional mount accessories. NOTE: The device does not charge when outside the approved temperature range (Specifications, page 13). You can charge the battery using a standard wall outlet or a USB port on your computer. 1 Pull up the weather cap from the mini-USB port . 2 Plug the small end of the USB cable into the mini-USB port. 3 Plug the USB end of the cable into an AC adapter or a computer USB port. 4 If necessary, plug the AC adapter into a standard wall outlet. When you connect the device to a power source, the device turns on. 5 Charge the battery completely. Installing AA Batteries Instead of the optional NiMH battery pack (Installing a NiMH Battery Pack, page 1), you can use two alkaline, NiMH, or lithium batteries. This is useful when you are on the trail and cannot charge the NiMH battery pack. Use NiMH or lithium batteries for best results. NOTE: Standard alkaline batteries are not recommended for the 64sc/csx models when using the camera feature. 1 Turn the D-ring counter-clockwise, and pull up to remove the cover. 2 Insert two AA batteries, observing polarity. 3 Replace the battery cover, and turn the D-ring clockwise. 4 Hold . 5 Select Setup > System > AA Battery Type. 6 Select Alkaline, Lithium, Traditional NiMH, or Precharged NiMH. Turning On the Device Hold . Keys FIND MARK QUIT ENTER MENU PAGE IN OUT Select to open the search menu. Select to save your current location as a waypoint. Select to cancel or return to the previous menu or page. Select to scroll through the main pages. Select to select options and acknowledge messages. Select to open the options menu for the page that is currently open. Select twice to open the main menu (from any page). Select to scroll through the main pages. Select , , , or to select menu options and move the map cursor. Select to zoom in on the map. Select to zoom out on the map. Acquiring Satellite Signals It may take 30 to 60 seconds to acquire satellite signals. 1 Go outdoors to an open area. 2 If necessary, turn on the device. 3 Wait while the device searches for satellites. flashes while the device determines your location. shows the satellite signal strength. Using the Main Pages The information needed to operate this device is found on the main menu, map, compass, trip computer, and elevation plot pages. Select PAGE to choose the active main page. Opening the Main Menu The main menu gives you access to tools and setup screens for waypoints, activities, routes, and more (Additional Main Menu Tools, page 8). From any page, select MENU twice. Map represents your location on the map. As you travel, moves and leaves a track log (trail). Waypoint names and symbols appear on the map. When you are navigating to a destination, your route is marked with a colored line on the map. Changing the Map Orientation 1 From the map, select MENU. 2 Select Setup Map > Orientation. 3 Select an option: • Select North Up to show north at the top of the page. 2 Using the Main Pages
-
 1
1 -
 2
2 -
 3
3 -
 4
4 -
 5
5 -
 6
6 -
 7
7 -
 8
8 -
 9
9 -
 10
10 -
 11
11 -
 12
12 -
13
-
14
-
15
-
16
-
17
-
18
-
19
-
20
 |
 |
