Garmin Garmin babyCam Owner s Manual - Page 7
Adhesive Mount Accessory, Receiver Cable
 |
View all Garmin Garmin babyCam manuals
Add to My Manuals
Save this manual to your list of manuals |
Page 7 highlights
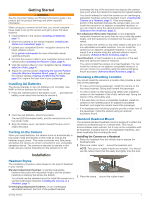
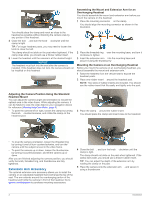
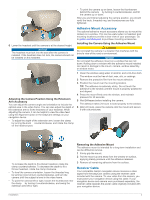
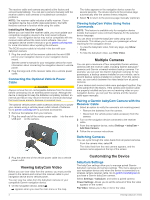
• To point the camera up or down, loosen the thumbscrew behind the camera by turning it counterclockwise, and tilt à the camera up or down. After you are finished adjusting the camera position, you should verify the knob, threaded ring, and thumbscrews are fully tightened. 6 Lower the headrest until the camera is at the desired height. NOTICE The headrest must lock into the seat after the camera is installed. If the headrest does not lock, the camera should not be installed on this headrest. Adjusting the Camera Position Using the Extension Arm Accessory You can adjust the camera angle and orientation to include the optimal area in the video frame. You can also adjust the depth of the extension arm to fit the thickness of your headrest. While adjusting the camera, it can be helpful to view the video feed using the Alignment option in the babyCam settings on your navigation device. • To adjust the depth of the extension arm, loosen the clamp by turning the knob counterclockwise, and rotate the clamp À on the headrest post. Adhesive Mount Accessory The optional adhesive mount accessory allows you to mount the camera on a window. This can be useful when no headrest post mounting locations provide a clear view of your passenger. Go to garmin.com/babycam to purchase mounting accessories. Installing the Camera Using the Adhesive Mount CAUTION Do not install the camera in a location that interferes with the driver's view of the road or environment. NOTICE Do not install the adhesive mount on a window that can roll down. Rolling down a window with the adhesive mount installed can result in damage to the mount, camera, window assembly, or window motor. 1 Clean the window using water or alcohol, and a lint-free cloth. The window must be free of dust, wax, oils, or coatings. 2 Remove the protective film from the mount adhesive. 3 Position the mount over the mounting location. TIP: The adhesive is extremely sticky. Do not touch the adhesive to the window until the mount is properly positioned and aligned. 4 Press the mount firmly onto the window, and maintain pressure for 30 seconds. 5 Wait 24 hours before installing the camera. The adhesive takes 24 hours to bond properly to the window. 6 After 24 hours, place the camera onto the mount and secure it with a thumbscrew. To increase the depth to fit a thicker headrest, rotate the clamp counterclockwise. To decrease the depth to fit a thinner headrest, rotate the clamp clockwise. • To level the camera orientation, loosen the threaded ring Á by turning it one full turn counterclockwise, and turn the camera until the subject is level in the video frame. • To point the camera left or right, loosen the thumbscrew near the clamp by turning it counterclockwise, and swing the  extension arm left or right. Removing the Adhesive Mount The adhesive mount is intended for a long-term installation and can be difficult to remove. 1 Firmly grip the mount. 2 Pull the mount up and away from the window or surface, applying steady pressure until the adhesive releases. 3 Remove all remaining adhesive from the surface. Receiver Cable Your compatible Garmin navigation device receives a video signal from the babyCam camera using the receiver cable included with the camera. To view video from the camera, you must power your navigation device using this cable. If your navigation device and camera were purchased separately, the receiver cable replaces the power cable originally included with your navigation device. Installation 3
-
 1
1 -
 2
2 -
 3
3 -
 4
4 -
 5
5 -
 6
6 -
 7
7 -
 8
8 -
 9
9 -
 10
10
 |
 |
