Garmin Garmin babyCam Owner s Manual - Page 9
Device Maintenance, Device Information, Troubleshooting - range
 |
View all Garmin Garmin babyCam manuals
Add to My Manuals
Save this manual to your list of manuals |
Page 9 highlights
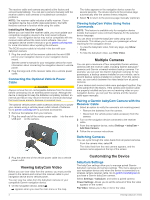
Alignment: Displays the babyCam video to help you align the camera. Check Seat Reminder: Enables a reminder to check for rear seat passengers before exiting the vehicle. Unpair: Removes the paired camera. Rename: Allows you to rename the paired camera. Flipping and Mirroring the Video Depending on the camera orientation, the video on your navigation device may appear upside down or mirrored by default. You can flip the video vertically or mirror the video horizontally to correct the video. 1 Select Settings > babyCam. 2 Select a camera from the list. 3 Select Flip Video, and select an option. Check Seat Reminder The check seat reminder plays a tone and displays a message to remind you to check your vehicle for passengers before exiting. If you viewed the babyCam video during your drive, the most recent image from the camera also appears. Device Maintenance Updating the Camera Software When you update your navigation device, the latest camera software is included in the update. The next time you connect your navigation device to the receiver cable, it updates your camera software wirelessly when a camera software update is available. 1 Update your navigation device to the latest software. Go to garmin.com/express or see your navigation device owner's manual for information about updating your navigation device. 2 Verify the camera batteries are installed or the camera is connected to external power. 3 Connect the updated navigation device to the receiver cable, and plug the receiver cable into an active vehicle power outlet. If a camera update is available, the navigation device sends the update to your camera, and a progress indicator appears on the navigation device. Cleaning the Device NOTICE Do not use a dry cloth to clean the lens. Use of a dry cloth may damage the lens. Avoid chemical cleaners and solvents that can damage plastic components. 1 Wipe the outer casing and lens with a soft, non-scratch cloth dampened with water or alcohol. 2 Wipe the outer casing dry, and allow the lens to air dry. Receiver cable temperature range Receiver cable input voltage Receiver cable fuse From -20° to 70°C (from -4° to 158°F) From 10 to 24 V 2 A, 250 V fast-blow Troubleshooting My navigation device does not show video from my camera • Replace the batteries in the camera (Installing AA Batteries, page 1). • Manually pair the camera and receiver cable (Pairing a Garmin babyCam Camera with the Receiver Cable, page 4). • If you are using the optional vehicle power cable, verify the vehicle power outlet is providing power. The LED on the vehicle power cable plug illuminates when it is receiving power. My camera does not stay in position • Verify the knob, thumbscrews, and threaded ring are fully tightened. • Verify the thumbscrew that secures the joint between the mount and the camera is installed in the correct direction, as shown in the installation illustrations. When it is installed correctly, the thumbscrew grip is on the opposite side of the mount from the threaded hole. When should I replace the batteries? The batteries can last 3 to 12 months with daily use. The battery life depends on several factors, including the power setting (babyCam Settings, page 4), the type of batteries used, and the ambient temperature. A low battery power alert appears on your navigation device when the camera batteries are low. You can also use these options to verify manually whether the batteries are providing power. • Check the batteries using an external battery tester. • Remove the batteries from the camera, wait several seconds, and reinstall them in the camera. The red power LED illuminates for about two seconds if the camera receives adequate power from the batteries. If the LED does not illuminate, or if it turns off in less than one second, you should change the batteries. I cannot tell whether the camera is on or off The device is on while it is receiving power from either the batteries or the optional vehicle power cable accessory. You cannot turn off the device. • To conserve power, the power LED on the device is not illuminated during normal use. • When you install batteries or connect the vehicle power cable, the red power LED illuminates briefly to indicate the camera is receiving power. Device Information Specifications Camera input voltage Battery type Camera temperature range From 4.75 to 5.25 Vdc Two AA batteries (NiMH, alkaline, or lithium) From -20° to 70°C (from -4° to 158°F) Device Maintenance 5
-
 1
1 -
2
-
3
-
 4
4 -
 5
5 -
 6
6 -
 7
7 -
 8
8 -
 9
9 -
 10
10
 |
 |
