Garmin Vector S Owner's Manual - Page 10
Edge 800 Device Instructions, Edge 500 Device Instructions, Power Data Fields - vector support
 |
View all Garmin Vector S manuals
Add to My Manuals
Save this manual to your list of manuals |
Page 10 highlights
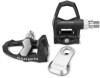
When the sensor is paired with your Edge device, the sensor status is Connected. You can customize a data field to display Vector data. Entering the Crank Length The crank length is often printed on the crank arm. 1 Rotate the pedals a few times in order to activate Vector. 2 From the home screen, select > Bike Profiles. 3 Select a profile. 4 Select Crank Length > Manual. 5 Enter the crank length, and select . Performing a Static Zero Calibration NOTE: During this task, the bike must be in an upright position, and nothing can be touching the pedals. 1 From the home screen, select > Bike Profiles. 2 Select a profile. 3 Select > Calibrate. When the zero reference is determined, a message appears on the Edge device. Edge 800 Device Instructions Pairing Vector with the Edge 800 Device 1 Bring the Edge device within range (3 m) of the sensor. NOTE: Stay 10 m away from other ANT + sensors while pairing. 2 Turn on the Edge device. 3 Select MENU > > Bike Settings > Bike Profiles. 4 Select a bike. 5 Select ANT + Power > Power Meter > Yes. 6 Rotate the crank arm a few times. 7 Select . When the sensor is paired with your Edge device, a message appears, and appears solid on the status page. You can customize a data field to display Vector data. Calibrating Vector with the Edge 800 Device 1 Enter the crank length (Entering the Crank Length). 2 Set the install angle of the sensors inside the pedals (Setting the Installation Angle). 3 Calibrate the static zero reference (Performing a Static Zero Calibration). 4 Calibrate Vector before each ride (Calibrating Vector Before Each Ride). Entering the Crank Length The crank length is often printed on the crank arm. 1 Rotate the pedals a few times in order to activate Vector. 2 Select MENU > > Bike Settings > Bike Profiles. 3 Select a profile. 4 Select Bike Details > Crank Length > Custom. 5 Enter the crank length, and select . Performing a Static Zero Calibration NOTE: During this task, the bike must be in an upright position, and nothing can be touching the pedals. 1 Select MENU > > Bike Settings > Bike Profiles. 2 Select a profile. 3 Select ANT + Power > Calibrate. When the zero reference is determined, a message appears on the Edge device. Edge 500 Device Instructions Pairing Vector with the Edge 500 Device 1 Bring the Edge device within range (3 m) of the sensor. NOTE: Stay 10 m away from other ANT + sensors while pairing. 2 Turn on the Edge device. 3 Hold MENU. 4 Select Settings > Bike Settings. 5 Select a bike. 6 Select ANT + Power. 7 Enable the sensor, and select Search. 8 Rotate the crank arm a few times. When the sensor is paired with your Edge device, a message appears, and appears solid on the main menu. You can customize a data field to display Vector data. Calibrating Vector with the Edge 500 Device 1 Enter the crank length (Entering the Crank Length). 2 Set the install angle of the sensors inside the pedals (Setting the Installation Angle). 3 Calibrate the static zero reference (Performing a Static Zero Calibration). 4 Calibrate Vector before each ride (Calibrating Vector Before Each Ride). Entering the Crank Length The crank length is often printed on the crank arm. 1 Rotate the pedals a few times in order to activate Vector. 2 Hold MENU. 3 Select Settings > Bike Settings. 4 Select a bike. 5 Select Bike Details > More > Crank Length > Manual. 6 Enter the crank length. Performing a Static Zero Calibration NOTE: During this task, the bike must be in an upright position, and nothing can be touching the pedals. 1 Hold MENU. 2 Select Settings > Bike Settings. 3 Select a bike. 4 Select ANT + Power > Calibrate. When the zero reference is determined, a message appears on the Edge device. Customizing the Data Fields This procedure contains instructions for the Edge 500 device. 1 Hold MENU. 2 Select Settings > Bike Settings > Data Fields. 3 Select a page. 4 Select the number of data fields to appear on the page. 5 Select a data field. Power Data Fields NOTE: This list contains power data fields for the Edge 1000 device. If you have another compatible device, see your device owner's manual. NOTE: Data fields that display pedal smoothness, torque effectiveness, and balance data are not supported by the Vector S system. Balance: The current left/right power balance. 6 Appendix
-
 1
1 -
2
-
3
-
4
-
 5
5 -
 6
6 -
 7
7 -
 8
8 -
 9
9 -
 10
10 -
 11
11 -
 12
12 -
 13
13 -
 14
14
 |
 |
