Garmin Vector S Owner's Manual - Page 8
Vector Device Care, Removing the Pedal Pod and Pedal, Replacing the Pedals and Cartridges - vector pedal pod
 |
View all Garmin Vector S manuals
Add to My Manuals
Save this manual to your list of manuals |
Page 8 highlights
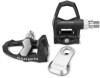
Analyze your data: You can view more detailed information about your activity, including time, distance, elevation, heart rate, calories burned, cadence, an overhead map view, pace and speed charts, and customizable reports. NOTE: Some data requires an optional accessory such as a heart rate monitor. Plan your training: You can choose a fitness goal and load one of the day-by-day training plans. Share your activities: You can connect with friends to follow each other's activities or post links to your activities on your favorite social networking sites. Disconnecting the USB Cable If your device is connected to your computer as a removable drive or volume, you must safely disconnect your device from your computer to avoid data loss. If your device is connected to your Windows® computer as a portable device, it is not necessary to safely disconnect. 1 Complete an action: • For Windows computers, select the Safely Remove Hardware icon in the system tray, and select your device. • For Mac® computers, drag the volume icon to the trash. 2 Disconnect the cable from your computer. Device Information Vector Device Care NOTICE Keep the components clean and free of debris. Do not use a sharp object to clean the device. Avoid chemical cleaners, solvents, and insect repellents that can damage plastic components and finishes. Do not submerge or pressure wash the components. Do not store the device where prolonged exposure to extreme temperatures can occur, because it can cause permanent damage. Replace components with Garmin parts only. See your Garmin dealer or the Garmin website. Removing the Pedal Pod and Pedal NOTICE Do not attempt to pry the cable from the spindle. Use the pedal wrench to slowly loosen the pedal . À Á NOTE: The spindle and crank for the left pedal has a lefthanded (reverse) thread. As you unscrew the pedal, the pedal pod cable disengages from the spindle. When you install Vector again, you must recalibrate the system. Replacing the Pedals and Cartridges Before you can start this task, you must obtain a cartridge axle tool (available from Exustar™ or Shimano®), 8 mm hex nut driver, 15 mm pedal wrench, and bike grease. NOTICE Other compatible tools can be used. Use care not to damage any of the Vector components. If your pedals are damaged or show significant wear, you can replace the pedals, cartridges, and related hardware components. NOTE: Pedal and cartridge replacement is the same for the Vector and Vector S systems. You should keep the left pedal parts separate from the right pedal parts. 1 Remove the pedals and pedal pods from your bike (Removing the Pedal Pod and Pedal). 2 Unscrew the pedal body from the cartridge using the À Á cartridge axle tool. NOTE: The right pedal has a left-handed (reverse) thread. 3 Remove the pedal body. 4 While securely holding the spindle with a pedal wrench, Â use the hex nut driver to remove the nut and washer . Ã Ä 5 Separate the cartridge from the spindle. 6 Remove the brass spacer ring and dust seal . Å Æ NOTE: The Vector S right pedal does not include brass spacer, and the dust seal is reversed. 7 Remove old grease from the spindle. 8 Slide the new dust seal and brass spacer ring over the spindle. The tapered side of the dust seal and brass spacer ring must face the base of the spindle. 4 Device Information
-
 1
1 -
2
-
 3
3 -
 4
4 -
 5
5 -
 6
6 -
 7
7 -
 8
8 -
 9
9 -
 10
10 -
 11
11 -
 12
12 -
 13
13 -
14
 |
 |
