Garmin Vector S Owner's Manual - Page 5
Thank You, Getting Started, Tools Needed, Installing the Vector Components - pedals
 |
View all Garmin Vector S manuals
Add to My Manuals
Save this manual to your list of manuals |
Page 5 highlights
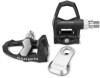
Introduction WARNING Read all instructions carefully before installing and using the Vector system. Improper use could result in serious injury. See the Important Safety and Product Information guide in the product box for product warnings and other important information. NOTICE Go to www.garmin.com/ vectorowner for the latest information including bike compatibility, software updates, and video tutorials. NOTE: Do not use more than two washers. Thank You Thank you for your Vector or Vector S purchase. This manual covers both Vector systems. Vector was designed for cyclists, by cyclists, to provide an outstanding experience of owning a precision power measurement system for your bike. Vector is simple, accurate, and easy to use. For software updates, video tutorials, and everything you need to get years of service out of your Vector, go to www.garmin.com/ vectorowner. Now it's time to put the power under your feet and get out there and ride. Getting Started 1 Install the Vector components (Installing the Vector Components). 2 Install the shoe cleats (Installing the Shoe Cleats). 3 Pair Vector with your Edge® (Paring Vector with Your Edge 1000). 4 Go for a ride (Your First Ride). 5 View your history (Vector Data). 6 Send your history to your computer (Sending Your Ride to Garmin Connect). Tools Needed • 15 mm pedal wrench • Bike grease • 3 mm hex key • 4 mm hex key Installing the Vector Components The installation steps for the Vector and Vector S systems are very similar. Procedures that are specific to the Vector S system are noted. Preparing the Crank Arms 1 Confirm the compatibility of your bike at www.garmin.com / vectorowner. 2 Remove the existing pedals. 3 Clean the threads, and remove old grease. Determining Pedal Pod Clearance NOTICE The pedal pod should contact the crank arm only at its mounting face, because this is the load-bearing connection. If the pedal pod contacts the crank arm anywhere else, the pedal pod may fracture when the pedal is tightened. • If the mounting face surrounding the threaded hole in the À crank arm is recessed, use one or two washers to fill the Á recess. • Make sure the pedal pod mounting face contacts the crank  arm only at its mounting face (or the washer used to fill the recess). If it touches anywhere else, you can use another washer to provide the necessary clearance. • If it is close, you can confirm proper clearance by sliding a piece of paper between the metal bracket and the crank arm face. • If the mounting face of the crank arm is protruding, do not use washers. Determining the Bicycle Chain Clearance Before you can install the right pedal, you must determine bicycle chain clearance. Move your bike chain to the largest chain ring and the smallest cassette gear. The bike chain should be in the outermost position to determine proper clearance between the pedal pod cable and the chain. NOTE: There must be at least 5 mm clearance between À the chain and the crank arm. Installing the Pedal Pod and Pedal This procedure is for the Vector system. For the Vector S system, see Installing the Left Pedal and Pedal Pod. NOTE: The left and right pedal pods are the same. 1 Install the left pedal first. 2 Apply a thin layer of grease on the pedal spindle and the À pedal pod where it contacts the pedal spindle. Á Introduction 1
-
 1
1 -
 2
2 -
 3
3 -
 4
4 -
 5
5 -
 6
6 -
 7
7 -
 8
8 -
 9
9 -
 10
10 -
 11
11 -
12
-
13
-
14
 |
 |
