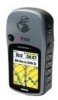
Garmin eTrex Legend C Owner's Manual - Page 66
MapSource, Setup - user manual
 |
UPC - 753759045555
View all Garmin eTrex Legend C manuals
Add to My Manuals
Save this manual to your list of manuals |
Page 66 highlights
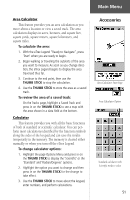
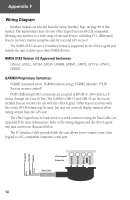
Appendix D MapSource Setup GARMIN MapSource CD-ROM's offer a variety of detailed mapping data and navigation information. MapSource is also an exellent medium for storage and safety backup of Personal Waypoints, Routes and Saved Tracks. See your GARMIN Dealer or visit the GARMIN website at: www.garmin.com for information. Transferring MapSource Map Data If you have purchased a GARMIN MapSource™ CD-ROM mapping program you may want to transfer detailed map data before beginning use, to provide your unit with maximum Find features and mapping capability. The eTrex Legend accepts up to 8 MB of map data from MetroGuide, Points of Interest, Fishing Hot Spots, Topographic maps, Roads and Recreation, and WorldMap mapping guides. Map data transfer requires the use of a PC, a GARMIN MapSource CD-ROM, and the PC Interface Cable with RS-232 serial port connector supplied with this unit. Follow detailed instructions for data transfer in the MapSource User's Manual. Transferring Map Data: You can transfer detailed map data to the eTrex Legend from a GARMIN MapSource CD-ROM. The eTrex Legend can accept up to 8 MB of data from any MapSource program loaded on a PC and connected to the eTrex Legend Data Port. For this function you need the eTrex PC Data Cable provided with your unit. To transfer data: 1. Remove the Power/Data Port cover on the back of the unit by lifting up on the protective cover on the back of the unit. 2. Connect the serial port connection on the cable to the PC serial port. 3. Connect the remaining cable connector to the back of the eTrex Legend by orienting the slot on the connector with indexing bar on the back of the unit. Then, slide the connector in place. 4. Turn on the eTrex Legend and follow instructions for map data transfer provided in the MapSource User's Manual. 56
-
 1
1 -
2
-
3
-
4
-
5
-
6
-
7
-
8
-
9
-
10
-
11
-
12
-
13
-
14
-
15
-
16
-
17
-
18
-
19
-
20
-
21
-
22
-
23
-
24
-
25
-
26
-
27
-
28
-
29
-
30
-
31
-
32
-
33
-
34
-
35
-
36
-
37
-
38
-
39
-
40
-
41
-
42
-
43
-
44
-
45
-
46
-
47
-
48
-
49
-
50
-
51
-
52
-
53
-
54
-
55
-
56
-
57
-
58
-
59
-
60
-
 61
61 -
 62
62 -
 63
63 -
 64
64 -
 65
65 -
 66
66 -
 67
67 -
 68
68 -
 69
69 -
 70
70 -
 71
71 -
72
-
73
-
74
-
75
-
76
 |
 |