Gastroback 40119 User Manual - Page 10
Assembling your Design Juicer Basic, Operating your Design Juicer Basic
 |
View all Gastroback 40119 manuals
Add to My Manuals
Save this manual to your list of manuals |
Page 10 highlights
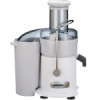
Assembling your Design Juicer Basic Slide the food pusher all the way down the feed chute (picture 5a). Step 6: 5a Place the pulp container into position by tilting the motor base slightly to the right. Insert the container under the juicer cover on the left-hand side ensuring it is supported by the container support extending from under the motor base (picture 6). NOTE: To minimise cleaning, line the pulp container with a plastic freezer bag to collect the pulp. Pulp can then be used in other dishes, or as compost for the garden or discarded. Step 7: Fit the custom-designed juice nozzle over the juice 6 spout and place a glass underneath. The juice nozzle will prevent splatter, ensuring mess free juicing (picture 7). 7 Operating your Design Juicer Basic WARNING: Make sure the appliance is completely assembled and that there are nor foreign objects in the feed chute before putting the plug into the power point. Never put fingers, wooden spoons or other foreign substances (such as hair, clothing, brushes, cloth) into the feed chute. Always turn the appliance off and wait for the motor to stop moving before removing the lid of the juicer. Keep the working place clean and dry. Do not let any liquids or water run into the motor block. Do not put any cloth or napkins underneath the appliance to avoid endangering by fire and voltage. In case that water or other liquids ran into the motor block while operating turn off the appliance immediately, pull the plug and dry the appliance with a clean cloth. Operate according to the instructions ´Trouble shooting guide`. 10
-
 1
1 -
2
-
3
-
4
-
 5
5 -
 6
6 -
 7
7 -
 8
8 -
 9
9 -
 10
10 -
 11
11 -
 12
12 -
 13
13 -
 14
14 -
 15
15 -
16
-
17
-
18
-
19
-
20
-
21
-
22
-
23
-
24
-
25
-
26
-
27
-
28
 |
 |
