Gastroback 40119 User Manual - Page 11
Operating your Design Juicer Basic
 |
View all Gastroback 40119 manuals
Add to My Manuals
Save this manual to your list of manuals |
Page 11 highlights
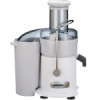
Operating your Design Juicer Basic Step1: Wash your selection of fruit and vegetables before juicing. NOTE: Most fruit and vegetables such ! as small apples, carrots and cucumber will not need to be cut to size as these will fit into the feed chute whole. When juicing carrots place the tip of the carrot into the feed chute last. Step 2: Ensure the juicer is correctly assembled. Ensure the stainless steel filter is thoroughly cleaned before each use (refer to ´Care and cleaning`). Ensure you place a glass or jug under the spout before commencing juicing. Step 3: Plug the power cord into a 220/230V power outlet and turn the power 'ON'. Push the 'ON/OFF' button to 'ON'. Step 4: With the motor running, place food into the feed chute. Using the food pusher, gently guide food down the feed chute. To extract the maximum amount of juice, always push the food pusher down slowly. Slowly push down the food pusher to get the most profitable amount of juice Step 5: Juice will flow into the glass and the separated pulp will accumulate in the integrated pulp container. ATTENTION: Do not allow the pulp container to overfill as this may affect the operation of the appliance (refer to disassembling instructions). Reassemble machine to continue juicing. To minimise cleaning, line the pulp container with a plastic freezer bag to collect the pulp. Empty the pulp container during juicing The pulp container can be emptied during juicing by turning the appliance 'Off' at the control panel and then carefully removing the pulp container. Remove the pulp container by tilting the pulp container slightly to the right and unlatch it from under the juicer cover and the container support extending from under the motor base. Replace the empty pulp container into position before continuing to juice. NOTE: Do not use force removing the pulp container to avoid damage to the juicer cover. NOTE: In case that the appliance slows down, stumbles or stops all of a sudden turn off the appliance immediately and pull the plug to avoid overheating. Operate according to the instructions ´Trouble shooting guide`. WARNING: Never use fingers to push food down the feed chute or to clear the feed chute. Always use the food pusher provided. NOTE: Pay attention not to overflow the glass or jug. As soon as you finished operating turn the appliance ´OFF`. Always turn the appliance ´OFF` and pull the plug when the appliance is not in use and you finished the operation. Clean the appliance in accordance to the instructions in chapter 'Care and Cleaning`. Do not leave any food dry on the surfaces of the appliance or the filter basket. 11
-
 1
1 -
2
-
3
-
4
-
5
-
 6
6 -
 7
7 -
 8
8 -
 9
9 -
 10
10 -
 11
11 -
 12
12 -
 13
13 -
 14
14 -
 15
15 -
 16
16 -
17
-
18
-
19
-
20
-
21
-
22
-
23
-
24
-
25
-
26
-
27
-
28
 |
 |
