Gateway NX200 Gateway Notebook Hardware Reference - Page 30
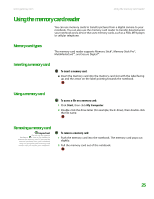
Adding and removing a PC Card
 |
View all Gateway NX200 manuals
Add to My Manuals
Save this manual to your list of manuals |
Page 30 highlights
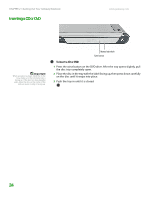
CHAPTER 2: Checking Out Your Gateway Notebook www.gateway.com Adding and removing a PC Card Your notebook has a PC Card slot (also known as a PCMCIA card slot). This slot accepts one Type II card. You do not need to restart your notebook when changing most cards because your notebook supports hot-swapping. Hot-swapping means that you can insert a PC Card while your notebook is running. If your PC Card does not work after hot-swapping, see the PC Card manufacturer's documentation for further information. To insert a PC Card: ■ Push the card firmly into the PC Card slot label-side up until the outer edge of the card is flush with the side of your notebook. Important If the remove hardware icon does not appear on the taskbar, click the show hidden icons button. To remove a PC Card: 1 Click the remove hardware icon in the taskbar, the PC Card name, then click Stop. -OR- Turn off your notebook. 2 Release the eject button by pressing the PC Card eject button once. 3 Eject the PC Card by pressing the eject button again. 26
-
 1
1 -
2
-
3
-
4
-
5
-
6
-
7
-
8
-
9
-
10
-
11
-
12
-
13
-
14
-
15
-
16
-
17
-
18
-
19
-
20
-
21
-
22
-
23
-
24
-
 25
25 -
 26
26 -
 27
27 -
 28
28 -
 29
29 -
 30
30 -
 31
31 -
 32
32 -
 33
33 -
 34
34 -
 35
35 -
36
-
37
-
38
-
39
-
40
-
41
-
42
-
43
-
44
-
45
-
46
-
47
-
48
-
49
-
50
-
51
-
52
-
53
-
54
-
55
-
56
-
57
-
58
-
59
-
60
-
61
-
62
-
63
-
64
-
65
-
66
 |
 |
