Gateway NX200 Gateway Notebook Hardware Reference - Page 42
Step 19, Step 15
 |
View all Gateway NX200 manuals
Add to My Manuals
Save this manual to your list of manuals |
Page 42 highlights
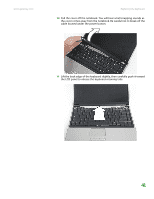
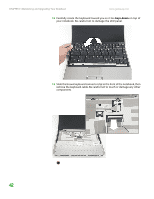
CHAPTER 3: Maintaining and Upgrading Your Notebook www.gateway.com 14 If your new hard drive already includes the hard drive bracket, go to Step 19. -OR- If you need to move the hard drive bracket from your old hard drive to your new hard drive, go to Step 15. 15 Remove the four screws that secure the hard drive to the hard drive kit bracket. Screws Screws 16 Remove the old drive from the bracket. 17 Insert the new drive into the bracket so the screw holes line up. 38
-
 1
1 -
2
-
3
-
4
-
5
-
6
-
7
-
8
-
9
-
10
-
11
-
12
-
13
-
14
-
15
-
16
-
17
-
18
-
19
-
20
-
21
-
22
-
23
-
24
-
25
-
26
-
27
-
28
-
29
-
30
-
31
-
32
-
33
-
34
-
35
-
36
-
 37
37 -
 38
38 -
 39
39 -
 40
40 -
 41
41 -
 42
42 -
 43
43 -
 44
44 -
 45
45 -
 46
46 -
 47
47 -
48
-
49
-
50
-
51
-
52
-
53
-
54
-
55
-
56
-
57
-
58
-
59
-
60
-
61
-
62
-
63
-
64
-
65
-
66
 |
 |

CHAPTER 3: Maintaining and Upgrading Your Notebook
www.gateway.com
38
14
If your new hard drive already includes the hard drive bracket, go to
Step 19
.
-OR-
If you need to move the hard drive bracket from your old hard drive to
your new hard drive, go to
Step 15
.
15
Remove the four screws that secure the hard drive to the hard drive kit
bracket.
16
Remove the old drive from the bracket.
17
Insert the new drive into the bracket so the screw holes line up.
Screws
Screws