Gateway XHD3000 User Manual - Page 11
Changing Windows screen settings
 |
View all Gateway XHD3000 manuals
Add to My Manuals
Save this manual to your list of manuals |
Page 11 highlights
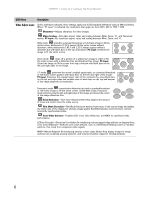
www.gateway.com OSD Menu Geometry menu Advanced menu Description H Position-Moves the display image left and right. You can also press the Auto button to configure the vertical and horizontal position automatically. V Position-Moves the display image up and down. You can also press the Auto button to configure the vertical and horizontal position automatically. Clock-Minimizes any vertical bars or stripes visible on the screen background. The horizontal screen size will also change. Phase-Minimizes any horizontal distortion and clears or sharpens the displayed characters. Color-Customizes the color levels. Language-Changes the language of the OSD. LED Mode-Changes the brightness of the Standby and Power LED to Day Mode or Nite Mode. When watching movies in a darkened room, you may want to change the LED mode to Nite Mode to avoid an over-bright, distracting power LED indicator. DVI Video mode-Changes the DVI video mode by enabling either RGB Color Space (used for digital input) and YUV Color Space (used for analog TV input such as NTSC, PAL, and SECAM). Audio Feedback-Changes the volume of the sounds that accompany button presses. Decrease all the way down to completely mute the button tones. Information-Displays current screen resolution and input source for the main display. Resolution reminder-If the computer display input (VGA and DVI) is not set to 1920 × 1200, displays a reminder that you should change your computer's settings to use the optimum 1920 × 1200 resolution. If you prefer using your monitor at a resolution less than 1920 × 1200, use this option to turn off the Resolution Reminder. For information on changing your computer's display resolution, see "Changing Windows screen settings" on page 7. Reset All-Resets all values to the factory settings. Changing Windows screen settings Adjusting the color depth and screen area are two of the most basic display settings you may need to change. You can also adjust settings such as the screen background and screen saver. Changing color depth and screen resolution Color depth and screen resolution are two of the most basic monitor settings you may need to change to suit your needs. Color depth is the number of colors your computer uses to display images on your monitor. Most images look best displayed with the maximum number of colors available. If the color in your images seems "false" or "jumpy," especially after you have played a game or run a video-intensive program, check the color depth setting and return it to the highest color setting, if necessary. Screen resolution is the number of pixels (individual colored dots) your computer uses to display images on your monitor. The higher the resolution, the more information and screen components (such as icons and menu bars) can be displayed on the monitor. Help For more information about adjusting the screen, click Start, then click Help and Support. Type adjusting monitor settings in the Search Help box, then press ENTER. 7
-
 1
1 -
2
-
3
-
4
-
5
-
 6
6 -
 7
7 -
 8
8 -
 9
9 -
 10
10 -
 11
11 -
 12
12 -
 13
13 -
 14
14 -
 15
15 -
 16
16 -
17
-
18
-
19
-
20
-
21
-
22
-
23
-
24
-
25
-
26
-
27
-
28
 |
 |