GE 25865GE3 User Guide - Page 11
Installing the Base Station - cordless phone
 |
UPC - 044319500691
View all GE 25865GE3 manuals
Add to My Manuals
Save this manual to your list of manuals |
Page 11 highlights
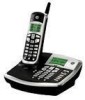
Installing the Base Station Installing the Backup Batteries on Base Unit To avoid power outage, you can install four AA alkaline batteries (not included in sales) into the base as the backup. 1. Remove the battery compartment cover (located on the bottom of the base). 2. Follow the battery installation display and insert four AA alkaline batteries inside the compartment. 3. Put the battery compartment cover back into place. Connecting the Base Station 1. Choose an area near an electrical outlet and a telephone wall jack (either two RJ11 or one RJ14 type), and place your cordless telephone on a level surface, such as a desktop or tabletop, or you may mount it on the wall. 2. Plug the AC power converter into the electrical outlet and the DC connector into the jack on the back of the base. 3. Plug one end of a telephone line cord into the TEL LINE 1 jack on the back of the base and the other end into the modular wall jack for Line 1. Plug the other telephone line cord into the TEL LINE 2 jack on the back of the base and the other end into modular wall jack for Line 2. NOTE: If you have only one wall jack for the both lines, use the TEL LINE 1/L1 + L2 jack on the back of base. 4. Place the handset in the base cradle. The charge/in use indicator turns on, verifying the battery is charging. HANDSET 1 shows in the handset's display after approximately 2 minutes. 5. Allow the phone to charge for 16 hours prior to first use. If you don't properly charge the phone, battery performance is compromised. CAUTION: Use only the 5-2605 power adaptor that came with this unit. Using other power adaptors may damage the unit. Wall Mounting the Base 1. Turn the base over. 2. Slide the pedestal into the slots on the bottom of the base, and then push the pedestal down until it snaps into place. 3. Slip the mounting holes on the pedestal over the wall plate posts and firmly slide the unit into place. (Wall plate not included.) 11
-
 1
1 -
2
-
3
-
4
-
5
-
 6
6 -
 7
7 -
 8
8 -
 9
9 -
 10
10 -
 11
11 -
 12
12 -
 13
13 -
 14
14 -
 15
15 -
 16
16 -
17
-
18
-
19
-
20
-
21
-
22
-
23
-
24
-
25
-
26
-
27
-
28
-
29
-
30
-
31
-
32
-
33
-
34
-
35
-
36
-
37
-
38
-
39
-
40
-
41
-
42
-
43
-
44
-
45
-
46
-
47
-
48
-
49
-
50
-
51
-
52
-
53
-
54
-
55
-
56
-
57
-
58
-
59
-
60
-
61
-
62
-
63
-
64
-
65
-
66
-
67
-
68
-
69
-
70
-
71
-
72
-
73
-
74
-
75
-
76
-
77
-
78
-
79
-
80
-
81
-
82
-
83
-
84
-
85
-
86
-
87
-
88
-
89
-
90
-
91
-
92
-
93
-
94
-
95
-
96
-
97
-
98
-
99
-
100
-
101
-
102
-
103
-
104
-
105
-
106
-
107
-
108
 |
 |
