GE A735 User Manual (English) - Page 75
Left/Right, Up/Down, Start, Cancel, Playback, Red-eye removal, Red-eye, removal
 |
UPC - 810027010407
View all GE A735 manuals
Add to My Manuals
Save this manual to your list of manuals |
Page 75 highlights
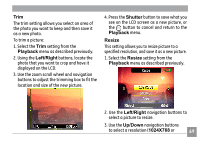
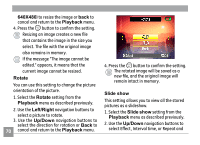
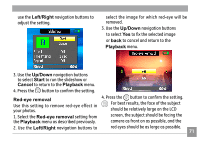
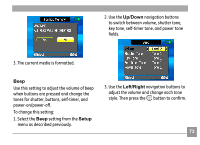
use the Left/Right navigation buttons to adjust the setting. select the image for which red-eye will be removed. 3. Use the Up/Down navigation buttons to select Yes to fix the selected image or back to cancel and return to the Playback menu. 3. Use the Up/Down navigation buttons to select Start to run the slideshow or Cancel to return to the Playback menu. 4. Press the button to confirm the setting. Red-eye removal Use this setting to remove red-eye effect in 4. Press the button to confirm the setting. For best results, the face of the subject your photos. should be relatively large on the LCD 1. Select the Red-eye removal setting from the Playback menu as described previously. screen, the subject should be facing the camera as front on as possible, and the 2. Use the Left/Right navigation buttons to red eyes should be as large as possible. 71
-
 1
1 -
2
-
3
-
4
-
5
-
6
-
7
-
8
-
9
-
10
-
11
-
12
-
13
-
14
-
15
-
16
-
17
-
18
-
19
-
20
-
21
-
22
-
23
-
24
-
25
-
26
-
27
-
28
-
29
-
30
-
31
-
32
-
33
-
34
-
35
-
36
-
37
-
38
-
39
-
40
-
41
-
42
-
43
-
44
-
45
-
46
-
47
-
48
-
49
-
50
-
51
-
52
-
53
-
54
-
55
-
56
-
57
-
58
-
59
-
60
-
61
-
62
-
63
-
64
-
65
-
66
-
67
-
68
-
69
-
 70
70 -
 71
71 -
 72
72 -
 73
73 -
 74
74 -
 75
75 -
 76
76 -
 77
77 -
 78
78 -
 79
79 -
 80
80 -
81
-
82
-
83
-
84
-
85
-
86
-
87
-
88
-
89
-
90
-
91
-
92
-
93
-
94
-
95
-
96
-
97
-
98
-
99
-
100
-
101
-
102
-
103
-
104
-
105
-
106
-
107
-
108
-
109
-
110
-
111
-
112
-
113
-
114
-
115
 |
 |
