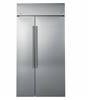
GE CSB42WSKSS Use and Care Manual - Page 11
About shelves.
 |
View all GE CSB42WSKSS manuals
Add to My Manuals
Save this manual to your list of manuals |
Page 11 highlights
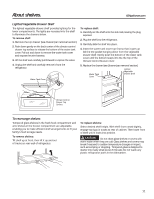
About shelves. GEAppliances.com Lighted Vegetable Drawer Shelf The lighted vegetable drawer shelf provides lighting for the lower compartments. The lights are recessed into the shelf to illuminate the drawers below. To remove shelf: 1. Remove the top drawer (see Drawer/pan removal section). 2. Push down gently on the back center of the climate control drawer top surface to release the bottom of the water tank cover. Pull out and down to remove the water tank cover and expose the wire harness. 3. Lift the shelf and carefully pull forward to expose the wires. 4. Unplug the shelf and carefully remove it from the refrigerator. Water Tank Cover To replace shelf: 1. Carefully set the shelf onto the side rails, leaving the plug exposed. 2. Plug the shelf into the refrigerator. 3. Carefully slide the shelf into place. 4. Insert the water tank cover top first so that it goes up behind the gasket hanging down from the vegetable drawer shelf. Gently push the bottom of the water tank cover until the bottom snaps into the the top of the Climate Control Drawer cover. 5. Replace the drawer (see Drawer/pan removal section). Water Tank Cover Lighted Vegetable Drawer Shelf Climate Control Drawer Top Surface To rearrange shelves Tempered glass shelves in the fresh food compartment and wire shelves in the freezer compartment are adjustable, enabling you to make efficient shelf arrangements to fit your family's food storage needs. To remove shelves: Tilt shelf up at front, then lift it up and out of tracks on rear wall of refrigerator. To replace shelves: Select desired shelf height. With shelf front raised slightly, engage top lugs in tracks at rear of cabinet. Then lower front of shelf until it locks into position. CAUTION Do not clean glass shelves or covers with warm water when they are cold. Glass shelves and covers may break if exposed to sudden temperature changes or impact, such as bumping or dropping. Tempered glass is designed to shatter into many small pieces if it breaks. Do not wash any plastic refrigerator parts in the dishwasher. 11
-
 1
1 -
2
-
3
-
4
-
5
-
 6
6 -
 7
7 -
 8
8 -
 9
9 -
 10
10 -
 11
11 -
 12
12 -
 13
13 -
 14
14 -
 15
15 -
 16
16 -
17
-
18
-
19
-
20
-
21
-
22
-
23
-
24
-
25
-
26
-
27
-
28
-
29
-
30
-
31
-
32
-
33
-
34
-
35
-
36
-
37
-
38
-
39
-
40
-
41
-
42
-
43
-
44
-
45
-
46
-
47
-
48
-
49
-
50
-
51
-
52
-
53
-
54
-
55
-
56
-
57
-
58
-
59
-
60
-
61
-
62
-
63
-
64
-
65
-
66
-
67
-
68
-
69
-
70
-
71
-
72
-
73
-
74
-
75
-
76
-
77
-
78
-
79
-
80
-
81
-
82
-
83
-
84
-
85
-
86
-
87
-
88
-
89
-
90
-
91
-
92
 |
 |
