GE CSB42WSKSS Use and Care Manual - Page 16
Installation Instructions
 |
View all GE CSB42WSKSS manuals
Add to My Manuals
Save this manual to your list of manuals |
Page 16 highlights
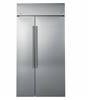
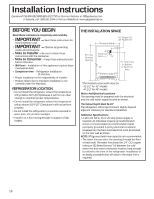
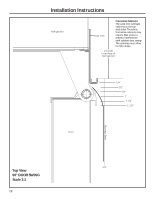
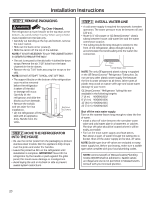
Installation Instructions Questions? Call 800.GE.CARES (800.432.2737) or Visit our Website at: GEAppliances.com Questions? In Canada, call 1.800.561.3344 or Visit our Website at: www.geappliances.ca BEFORE YOU BEGIN Read these instructions completely and carefully. IMPORTANT - • Save these instructions for local inspector's use. • IMPORTANT - Observe all governing codes and ordinances. • Note to Installer - Be sure to leave these instructions with the Consumer. • Note to Consumer - Keep these instructions for future reference. • Skill level - Installation of this appliance requires basic mechanical skills. • Completion time - Refrigerator Installation 15 minutes • Proper installation is the responsibility of installer. • Product failure due to improper installation is not covered under the Warranty. REFRIGERATOR LOCATION • Do not install the refrigerator where the temperature will go below 60°F (16°C) because it will not run often enough to maintain proper temperatures. • Do not install the refrigerator where the temperature will go above 100°F (37°C) because it will not perform properly. • Do not install the refrigerator in a location exposed to water (rain, etc.) or direct sunlight. • Install it on a floor strong enough to support it fully loaded. THE INSTALLATION SPACE *Finished Width 42" Models 18" 48" Models 20" 85" max Finished Opening 6" Electrical Area 5" 24" 5" Water Supply 5" 75" From Floor to Bottom of Electrical Area 3 1/2" 3 1/2" *The finished cutout width must be: 41-1/2" for 42" models 47-1/2" for 48" models Water And Electrical Locations The opening must be prepared with the electrical and the cold water supply located as shown. The Cutout Depth Must Be 24" The refrigerator will project forward, slightly beyond adjacent cabinetry for standard installation. Additional Specifications • A 115 volt 60Hz., 15 or 20 amp power supply is required. An individual properly grounded branch circuit or circuit breaker is recommended. Install a properly grounded 3-prong electrical receptacle recessed into the back wall. Electrical must be located on the rear wall as shown. NOTE: GFI (ground fault interrupter) is not recommended. • The water line can enter the opening through the floor or back wall. The water line should be 1/4" O.D. copper tubing or GE SmartConnect™ kit between the cold water line and water connection location, long enough to extend to the front of the refrigerator. Installation of an easily accessible shut-off valve in the water line is required. 16
-
 1
1 -
2
-
3
-
4
-
5
-
6
-
7
-
8
-
9
-
10
-
 11
11 -
 12
12 -
 13
13 -
 14
14 -
 15
15 -
 16
16 -
 17
17 -
 18
18 -
 19
19 -
 20
20 -
 21
21 -
22
-
23
-
24
-
25
-
26
-
27
-
28
-
29
-
30
-
31
-
32
-
33
-
34
-
35
-
36
-
37
-
38
-
39
-
40
-
41
-
42
-
43
-
44
-
45
-
46
-
47
-
48
-
49
-
50
-
51
-
52
-
53
-
54
-
55
-
56
-
57
-
58
-
59
-
60
-
61
-
62
-
63
-
64
-
65
-
66
-
67
-
68
-
69
-
70
-
71
-
72
-
73
-
74
-
75
-
76
-
77
-
78
-
79
-
80
-
81
-
82
-
83
-
84
-
85
-
86
-
87
-
88
-
89
-
90
-
91
-
92
 |
 |