GE CSB42WSKSS Use and Care Manual - Page 19
Tools And Materials Required, Hardware Supplied, Grounding The Refrigerator, Flooring
 |
View all GE CSB42WSKSS manuals
Add to My Manuals
Save this manual to your list of manuals |
Page 19 highlights
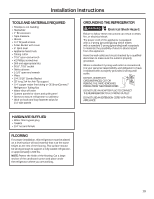
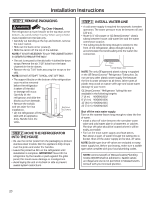
Installation Instructions TOOLS AND MATERIALS REQUIRED • Tinsnips to cut banding • Stepladder • 1" Bit extension • Tape measure • Gloves • 1/4" Drywall screws • 5-Gal. Bucket with cover • 6" Spirit level • Appliance hand truck • Tubing cutter • 7/16" open-end wrench • #2 Phillips screwdriver • Drill and appropriate bits • 5/16", 7/16" socket • Safety glasses • 1-1/8" open end wrench • Pliers • 1/4", 5/16" Combo Rachet • 35" long 2x4 for Anti-Tip support • 1/4" copper water line tubing or GE SmartConnect™ Refrigerator Tubing kits • Water shut-off valve • Custom panels for doors and grille panel • Screws to secure refrigerator to cabinetry • Stick-on hook and loop fastener strips for 1/4" side panels GROUNDING THE REFRIGERATOR WARNING Electrical Shock Hazard. Failure to follow these instructions can result in death, fire, or electrical shock. The power cord of this appliance is equipped with a 3-prong (grounding) plug which mates with a standard 3-prong (grounding) wall receptacle to minimize the possibility of electric shock hazard from this appliance. Have the wall outlet and circuit checked by a qualified electrician to make sure the outlet is properly grounded. Where a standard 2-prong wall outlet is encountered, it is your personal responsibility and obligation to have it replaced with a properly grounded 3-prong wall outlet. DO NOT, UNDER ANY CIRCUMSTANCES, CUT OR REMOVE THE THIRD (GROUND) PRONG FROM THE POWER CORD. DO NOT USE AN ADAPTER PLUG TO CONNECT THE REFRIGERATOR TO A 2-PRONG OUTLET. DO NOT USE AN EXTENSION CORD WITH THIS APPLIANCE. HARDWARE SUPPLIED • Water filter bypass plug • Toekick • 1/4" nut and ferrule FLOORING For proper installation, this refrigerator must be placed on a level surface of hard material that is at the same height as the rest of the flooring. This surface should be strong enough to support a fully loaded refrigerator, or approximately 1,500 lbs. NOTE: Protect the finish of the flooring. Cut a large section of the cardboard carton and place under the refrigerator where you are working. 19
-
 1
1 -
2
-
3
-
4
-
5
-
6
-
7
-
8
-
9
-
10
-
11
-
12
-
13
-
 14
14 -
 15
15 -
 16
16 -
 17
17 -
 18
18 -
 19
19 -
 20
20 -
 21
21 -
 22
22 -
 23
23 -
 24
24 -
25
-
26
-
27
-
28
-
29
-
30
-
31
-
32
-
33
-
34
-
35
-
36
-
37
-
38
-
39
-
40
-
41
-
42
-
43
-
44
-
45
-
46
-
47
-
48
-
49
-
50
-
51
-
52
-
53
-
54
-
55
-
56
-
57
-
58
-
59
-
60
-
61
-
62
-
63
-
64
-
65
-
66
-
67
-
68
-
69
-
70
-
71
-
72
-
73
-
74
-
75
-
76
-
77
-
78
-
79
-
80
-
81
-
82
-
83
-
84
-
85
-
86
-
87
-
88
-
89
-
90
-
91
-
92
 |
 |
