GE DPGT650EHWW Owners Manual - Page 7
Consumer Support, Troubleshooting Tips, Safety Instructions, Installation, Instructions - no heat
 |
UPC - 084691170303
View all GE DPGT650EHWW manuals
Add to My Manuals
Save this manual to your list of manuals |
Page 7 highlights
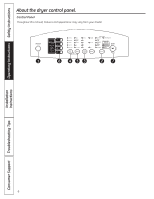
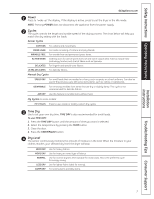
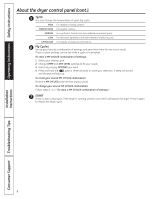
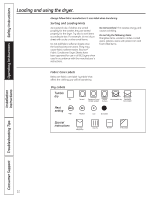
Safety Instructions Operating Instructions Installation Instructions GEAppliances.com 1 Power Press to "wake up" the display. If the display is active, press to put the dryer in the idle mode. NOTE: Pressing POWER does not disconnect the appliance from the power supply. 2 Cycles The cycle controls the length and tumble speed of the drying process. The chart below will help you match the dry setting with the loads. Sensor Cycles COTTONS For cottons and most linens. MIXED LOAD For loads consisting of cottons and poly-blends. WRINKLE FREE For wrinkle-free and permanent press items. ACTIVE WEAR Clothing worn for active sports exercise and some casual wear. Fabrics include new technology finishes and stretch fibers such as Spandex. DELICATES For lingerie and special-care fabrics. ULTRA DELICATES For delicate fabrics. Manual Dry Cycles SPEED DRY For small loads that are needed in a hurry, such as sports or school uniforms. Can also be used if the previous cycle left some items damp, such as collars or waistbands. DEWRINKLE For removing wrinkles from items that are dry or slightly damp. This cycle is not recommended for delicate fabrics. AIR DRY Use this feature to tumble items without heat. My Cycles (on some models) MY CYCLES Press to use, create or modify custom dry cycles. 3 Time Dry Use to set your own dry time. TIME DRY is also recommended for small loads. To use TIME DRY: 1. Press the TIME DRY button until the amount of time you want is selected. 2. Select the temperature by pressing the TEMP button. 3. Close the door. 4. Press the START/PAUSE button. 4 Dry Level The sensor continuously monitors the amount of moisture in the load. When the moisture in your clothes reaches your selected dry level, the dryer will stop. VERY DRY MORE DRY NORMAL LESS DRY DAMP DRY Use for heavy fabrics. Use for heavy or mixed type of fabrics. Use for normal dryness level suitable for most loads. This is the preferred cycle for energy saving. Use for lighter fabric (ideal for ironing). For leaving items partially damp. Troubleshooting Tips Consumer Support 7
-
 1
1 -
 2
2 -
 3
3 -
 4
4 -
 5
5 -
 6
6 -
 7
7 -
 8
8 -
 9
9 -
 10
10 -
 11
11 -
 12
12 -
13
-
14
-
15
-
16
-
17
-
18
-
19
-
20
-
21
-
22
-
23
-
24
-
25
-
26
-
27
-
28
-
29
-
30
-
31
-
32
-
33
-
34
-
35
-
36
-
37
-
38
-
39
-
40
-
41
-
42
-
43
-
44
-
45
-
46
-
47
-
48
-
49
-
50
-
51
-
52
-
53
-
54
-
55
-
56
-
57
-
58
-
59
-
60
-
61
-
62
-
63
-
64
-
65
-
66
-
67
-
68
-
69
-
70
-
71
-
72
 |
 |