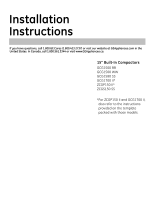
GE GCG1500RBB Installation Instructions - Page 2

Safety Information, CAUTION, BEFORE YOU BEGIN, WARNING - trash compactor

Page 2 highlights

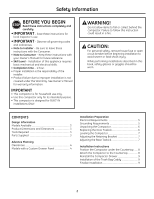
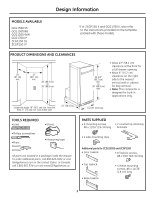
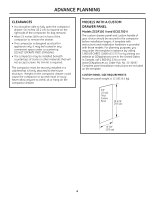
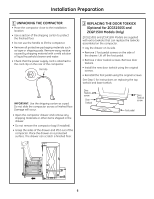
Safety Information BEFORE YOU BEGIN Read these instructions completely and carefully. • IMPORTANT - Save these instructions for local inspector's use. • IMPORTANT - Observe all governing codes and ordinances. • Note to Installer - Be sure to leave these instructions with the Consumer. • Note to Consumer - Keep these instructions with your Owner's Manual for future reference. • Skill Level - Installation of this appliance requires basic mechanical and electrical skills. • Completion time - 1 hour. • Proper installation is the responsibility of the installer. • Product failure due to improper installation is not covered under the Warranty. See Owner's Manual for warranty information. IMPORTANT • This compactor is for household use only. • Use this compactor only for its intended purpose. • This compactor is designed for BUILT-IN installations ONLY. WARNING! Do not allow items to fall or collect behind the compactor. Failure to follow this instruction could result in a fire. CAUTION: For personal safety, remove house fuse or open circuit breaker before beginning installation to avoid severe or fatal shock injury. While performing installations described in this book, safety glasses or goggles should be worn. CONTENTS Design Information Models Available 3 Product Dimensions and Clearances 3 Tools Required 3 Parts Supplied 3 Advance Planning Clearances 4 Models with a Custom Drawer Panel 4 Installation Preparation Electrical Requirements 5 Grounding Requirements 5 Unpacking the Compactor 6 Replacing the Door Toekick 6 Leveling the Compactor 7 Adjusting the Retaining Bracket 7 Adjusting the Base Toekick 7 Installation Instructions Position the Compactor under the Countertop ...... 8 Attach the Compactor to the Countertop 8 Reinstall the Compactor Drawer 9 Installation of the Trash Bag Caddy 9 Finalize Installation 9 2

  • 1
  • 2
  • 3
  • 4
  • 5
  • 6
  • 7
  • 8
  • 9
  • 10
  • 11
  • 12
  • 13
  • 14
  • 15
  • 16
  • 17
  • 18
  • 19
  • 20
  • 21
  • 22
  • 23
  • 24

Safety Information
CAUTION:
For personal safety, remove house fuse or open
circuit breaker before beginning installation to
avoid severe or fatal shock injury.
While performing installations described in this
book, safety glasses or goggles should be
worn.
BEFORE YOU BEGIN
Read these instructions completely and
carefully.
•IMPORTANT
Save these instructions for
local inspector’s use.
•IMPORTANT
Observe all governing codes
and ordinances.
Note to Installer
– Be sure to leave these
instructions with the Consumer.
Note to Consumer
– Keep these instructions with
your Owner’s Manual for future reference.
Skill Level
– Installation of this appliance requires
basic mechanical and electrical skills.
Completion time
– 1 hour.
Proper installation is the responsibility of the
installer.
• Product failure due to improper installation is not
covered under the Warranty. See Owner’s Manual
for warranty information
.
IMPORTANT
• This compactor is for household use only.
• Use this compactor only for its intended purpose.
• This compactor is designed for BUILT-IN
installations ONLY.
2
CONTENTS
Design Information
Models Available
....................................................................
3
Product Dimensions and Clearances
..........................
3
Tools Required
........................................................................
3
Parts Supplied
........................................................................
3
Advance Planning
Clearances
................................................................................
4
Models with a Custom Drawer Panel
..........................
4
Installation Preparation
Electrical Requirements
....................................................
5
Grounding Requirements
..................................................
5
Unpacking the Compactor
................................................
6
Replacing the Door Toekick
................................................
6
Leveling the Compactor
......................................................
7
Adjusting the Retaining Bracket
....................................
7
Adjusting the Base Toekick
................................................
7
Installation Instructions
Position the Compactor under the Countertop
......
8
Attach the Compactor to the Countertop
..................
8
Reinstall the Compactor Drawer
....................................
9
Installation of the Trash Bag Caddy
............................
9
Finalize Installation
................................................................
9
WARNING!
Do not allow items to fall or collect behind the
compactor. Failure to follow this instruction
could result in a fire.