GE GCG1500RBB Installation Instructions - Page 9
Installation
 |
UPC - 084691206958
View all GE GCG1500RBB manuals
Add to My Manuals
Save this manual to your list of manuals |
Page 9 highlights
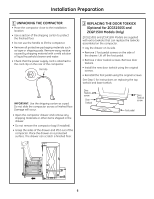
Installation 8 REINSTALL THE COMPACTOR DRAWER • Grasp the sides of the drawer. Carefully slide the drawer into the compactor. 9 INSTALLATION OF THE TRASH BAG CADDY (on some models) • Set the bag caddy into the drawer and hook the prepunched holes in the caddy on the bag retainer buttons. • Set the trash bag into the bag caddy and fold over. • Hook the holes in the bag over the bag retainer buttons. Trash bag caddy Bag retainer buttons 10 FINALIZE THE INSTALLATION • Turn power on at the source. • Turn the knob to ON. • Make sure the drawer is fully closed. • Lift the foot pedal to start the cycle. • The ram will travel downward, reverse and return to the starting position. • The compactor will shut off automatically. • The cycle should take less than 30 seconds. • Refer to your Owner's Manual for operating instructions. 9
-
 1
1 -
2
-
3
-
 4
4 -
 5
5 -
 6
6 -
 7
7 -
 8
8 -
 9
9 -
 10
10 -
 11
11 -
 12
12 -
 13
13 -
 14
14 -
15
-
16
-
17
-
18
-
19
-
20
-
21
-
22
-
23
-
24
 |
 |
