GE GCG1500RBB Installation Instructions - Page 7
Leveling The Compactor, Adjust The Retaining Bracket, Adjusting The Base Toekick
 |
UPC - 084691206958
View all GE GCG1500RBB manuals
Add to My Manuals
Save this manual to your list of manuals |
Page 7 highlights
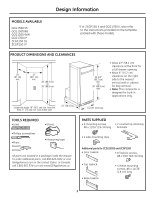
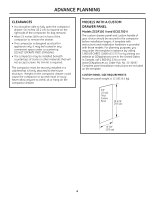
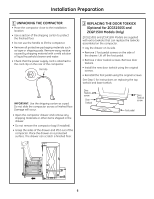
Installation Preparation 3 LEVELING THE COMPACTOR • The top of the compactor should be at least 1/8″ (3 mm) from the top of the cabinet opening. You can adjust the height of the compactor by turning the screws on the front leveling legs and rear wheels. 4 ADJUST THE RETAINING BRACKET • Determine installation depth of the compactor beneath the countertop. • Adjust the position of the retaining brackets so that the screws can meet the underside of the countertop. • Mounting clips are provided for stone or other hard countertops that will not accept screws. Front leveling legs Countertop Retaining bracket Rear wheels • Place a level inside the compactor on the floor of the cabinet. • Use the leveling legs to adjust level front to back and side to side. 5 ADJUSTING THE BASE TOEKICK A toekick extension is supplied. It can be used to cover any gaps from the bottom of the compactor to the floor. ZCGS150SS and ZCGP150II Models are also supplied with extra toekicks which can replace the original toekicks assembled on the compactor. • Remove the top toekick screws as shown. Lift off top toekick piece. • Loosen the base toekick screws, adjust to touch the floor and tighten the screws. If replacing the toekick, remove the screws and lift off the toekick. Install the new toekick with the original screws. • Reinstall the top toekick piece with the original screws. Top toekick 7 Base toekick Loosen screw on each side
-
 1
1 -
 2
2 -
 3
3 -
 4
4 -
 5
5 -
 6
6 -
 7
7 -
 8
8 -
 9
9 -
 10
10 -
 11
11 -
 12
12 -
13
-
14
-
15
-
16
-
17
-
18
-
19
-
20
-
21
-
22
-
23
-
24
 |
 |
