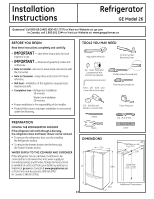
GE GFSS6KKYSS Installation Instructions - Page 20
Cont., Connecting The Refrigerator, To The House Water Line, Replacing The Freezer Door
 |
UPC - 084691190929
View all GE GFSS6KKYSS manuals
Add to My Manuals
Save this manual to your list of manuals |
Page 20 highlights
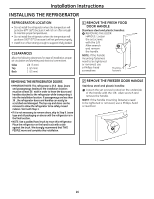
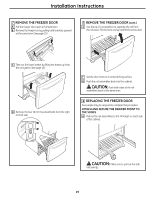
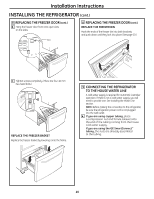
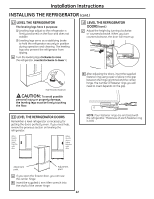
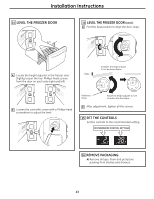
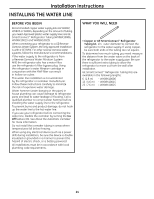
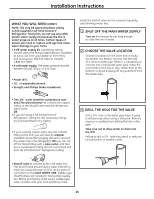
Installation Instructions INSTALLING THE REFRIGERATOR (cont.) 8 REPLACING THE FREEZER DOOR (cont.) B Hang the freezer door front onto open slots on the sides. Slot 8 REPLACING THE FREEZER DOOR (cont.) REPLACE THE FREEZER BIN Hook the ends of the freezer bin into both brackets, and push down until they lock into place. (See page 10.) C Tighten screws completely. (There are four 10 mm hex-head bolts.) REPLACE THE FREEZER BASKET Replace the freezer basket by lowering it into the frame. 9 CONNECTING THE REFRIGERATOR TO THE HOUSE WATER LINE A cold water supply is required for automatic icemaker operation. If there is not a cold water supply, you will need to provide one. See Installing the Water Line section. NOTE: Before making the connection to the refrigerator, be sure the refrigerator power cord is not plugged into the wall outlet. A If you are using copper tubing, place a compression nut and ferrule (sleeve) onto the end of the tubing coming from the house cold water supply. If you are using the GE SmartConnect™ tubing, the nuts are already assembled to the tubing. 20
-
 1
1 -
2
-
3
-
4
-
5
-
6
-
7
-
8
-
9
-
10
-
11
-
12
-
13
-
14
-
 15
15 -
 16
16 -
 17
17 -
 18
18 -
 19
19 -
 20
20 -
 21
21 -
 22
22 -
 23
23 -
 24
24 -
 25
25 -
26
-
27
-
28
-
29
-
30
-
31
-
32
-
33
-
34
-
35
-
36
-
37
-
38
-
39
-
40
-
41
-
42
-
43
-
44
-
45
-
46
-
47
-
48
-
49
-
50
-
51
-
52
-
53
-
54
-
55
-
56
-
57
-
58
-
59
-
60
-
61
-
62
-
63
-
64
-
65
-
66
-
67
-
68
-
69
-
70
-
71
-
72
-
73
-
74
-
75
-
76
-
77
-
78
-
79
-
80
-
81
-
82
-
83
-
84
-
85
-
86
-
87
-
88
-
89
-
90
-
91
-
92
-
93
-
94
-
95
-
96
-
97
-
98
-
99
-
100
-
101
-
102
-
103
-
104
-
105
-
106
-
107
-
108
-
109
-
110
-
111
-
112
 |
 |
