GE GFSS6KKYSS Installation Instructions - Page 22
Level The Refrigerator, Cont., Level The Refrigerator Doors, Doors - review
 |
UPC - 084691190929
View all GE GFSS6KKYSS manuals
Add to My Manuals
Save this manual to your list of manuals |
Page 22 highlights
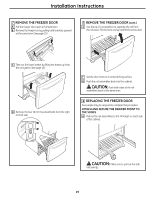
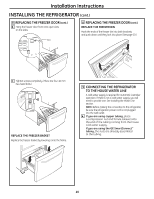
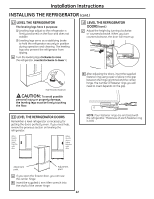
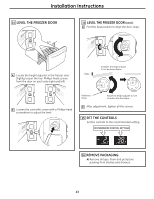
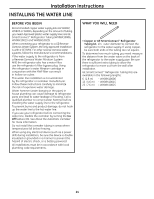
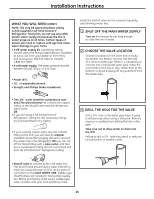
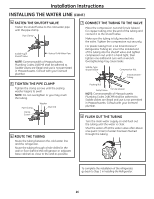
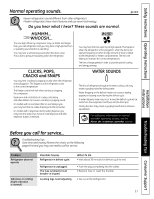
Installation Instructions INSTALLING THE REFRIGERATOR (cont.) 12 LEVEL THE REFRIGERATOR The leveling legs have 2 purposes: 1) Leveling legs adjust so the refrigerator is firmly positioned on the floor and does not wobble. 2) Leveling legs serve as a stabilizing brake to hold the refrigerator securely in position during operation and cleaning. The leveling legs also prevent the refrigerator from tipping. A Turn the leveling legs clockwise to raise the refrigerator, counterclockwise to lower it. 13 LEVEL THE REFRIGERATOR DOORS (cont.) C Adjust the height by turning clockwise or counterclockwise. When you turn counterclockwise, the door will move up. Flat-Head Screwdriver CAUTION: To avoid possible personal injury or property damage, the leveling legs must be firmly touching the floor. 13 LEVEL THE REFRIGERATOR DOORS Remember a level refrigerator is necessary for getting the doors perfectly even. If you need help, review the previous section on leveling the refrigerator. When the left door is lower than the right door. When the left door is higher than the right door. D After adjusting the doors, insert the supplied fastener ring using a pair of pliers in the gap between the hinge grommet and the center hinge. The number of fastener rings you will need to insert depends on the gap. NOTE: Four fastener rings are enclosed with the refrigerator. Thickness of each fastener ring is 0.04″. Adjustment point Adjustment point A If you open the freezer door, you can see the center hinge. B Insert the supplied 4 mm Allen wrench into the shaft of the center hinge. 22
-
 1
1 -
2
-
3
-
4
-
5
-
6
-
7
-
8
-
9
-
10
-
11
-
12
-
13
-
14
-
15
-
16
-
 17
17 -
 18
18 -
 19
19 -
 20
20 -
 21
21 -
 22
22 -
 23
23 -
 24
24 -
 25
25 -
 26
26 -
 27
27 -
28
-
29
-
30
-
31
-
32
-
33
-
34
-
35
-
36
-
37
-
38
-
39
-
40
-
41
-
42
-
43
-
44
-
45
-
46
-
47
-
48
-
49
-
50
-
51
-
52
-
53
-
54
-
55
-
56
-
57
-
58
-
59
-
60
-
61
-
62
-
63
-
64
-
65
-
66
-
67
-
68
-
69
-
70
-
71
-
72
-
73
-
74
-
75
-
76
-
77
-
78
-
79
-
80
-
81
-
82
-
83
-
84
-
85
-
86
-
87
-
88
-
89
-
90
-
91
-
92
-
93
-
94
-
95
-
96
-
97
-
98
-
99
-
100
-
101
-
102
-
103
-
104
-
105
-
106
-
107
-
108
-
109
-
110
-
111
-
112
 |
 |
