GE GSS20GEWWW Use and Care Manual - Page 10
Preparing to Install - canada
 |
UPC - 084691167068
View all GE GSS20GEWWW manuals
Add to My Manuals
Save this manual to your list of manuals |
Page 10 highlights
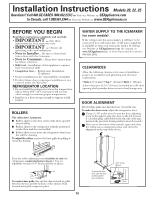
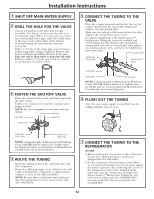
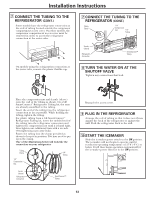
Installation Instructions Models 20, 22, 25 Questions? Call 800.GE.CARES (800.432.2737) or Visit our Website at: GEAppliances.com Questions? In Canada, call 1.800.561.3344 or Visit our Website at: www.GEAppliances.ca BEFORE YOU BEGIN Read these instructions completely and carefully. • IMPORTANT - Save these instructions for local inspector's use. • IMPORTANT - Observe all governing codes and ordinances. • Note to Installer - Be sure to leave these instructions with the Consumer. • Note to Consumer - Keep these instructions for future reference. • Skill level - Installation of this appliance requires basic mechanical skills. • Completion time - Refrigerator Installation 15 minutes • Proper installation is the responsibility of installer. • Product failure due to improper installation is not covered under the Warranty. REFRIGERATOR LOCATION • Do not install the refrigerator where the temperature will go below 60°F (16°C) because it will not run often enough to maintain proper temperatures. • Install it on a floor strong enough to support it fully loaded. ROLLERS The rollers have 3 purposes: ■ Rollers adjust so the door closes easily when opened about halfway. ■ Rollers adjust so the refrigerator is firmly positioned on the floor and does not wobble. ■ Rollers allow you to move the refrigerator away from the wall for cleaning. To adjust the rollers, remove the base grille by pulling it out at the bottom. WATER SUPPLY TO THE ICEMAKER (on some models) If the refrigerator has an icemaker, it will have to be connected to a cold water line. A GE water supply kit is available at extra cost from your dealer, by visiting our Website at GEAppliances.com (in Canada, at www.GEAppliances.ca), or from Parts and Accessories, 800.626.2002. CLEARANCES Allow the following clearances for ease of installation, proper air circulation and plumbing and electrical connections. • Sides 1/8″ (4 mm) • Top 1″ (25 mm) • Back 1″ (25 mm) A door clearance of 3/4″ (19 mm) is needed for a 90º door opening which provides better access to food storage area. DOOR ALIGNMENT After leveling, make sure that doors are even at the top. To make the doors even, adjust the refrigerator door. Using a 5/16″ socket wrench, turn the door adjusting screw to the right to raise the door, to the left to lower it. (A nylon plug, embedded in the threads of the pin, prevents the pin from turning unless a wrench is used.) After one or two turns of the wrench, open and close the refrigerator compartment door and check the alignment at the top of the doors. Turn the roller adjusting screws clockwise to raise the refrigerator, counterclockwise to lower it. Use an adjustable wrench (3/8″ hex head bolt) or pliers. To replace base grille, line up the clips on back of grille between the bar and the bottom of the cabinet. Push forward until grille snaps into place. 10 To remove the base grille, open the doors and then pull the grille straight out. 5/16″ Socket Wrench Raise
-
 1
1 -
2
-
3
-
4
-
 5
5 -
 6
6 -
 7
7 -
 8
8 -
 9
9 -
 10
10 -
 11
11 -
 12
12 -
 13
13 -
 14
14 -
 15
15 -
16
-
17
-
18
-
19
-
20
-
21
-
22
-
23
-
24
-
25
-
26
-
27
-
28
-
29
-
30
-
31
-
32
-
33
-
34
-
35
-
36
-
37
-
38
-
39
-
40
-
41
-
42
-
43
-
44
-
45
-
46
-
47
-
48
-
49
-
50
-
51
-
52
-
53
-
54
-
55
-
56
-
57
-
58
-
59
-
60
-
61
-
62
-
63
-
64
 |
 |
