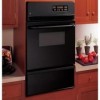
GE JGRS06BEJBB Installation Instructions - Page 3
Installation Instructions
 |
UPC - 084691098799
View all GE JGRS06BEJBB manuals
Add to My Manuals
Save this manual to your list of manuals |
Page 3 highlights
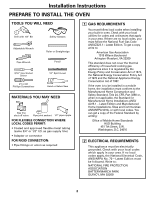
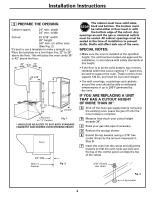
Installation Instructions 3 PREPARE THE OPENING Cabinet space: 24″ min. depth 24″ min. width Cutout: 22 3/16″ width 38″ height 3/8″ min. on either side (See Fig. 2) It's best to use a template to make a straight cut. Place the template on a level base line, 22″ to 28″ above the floor. This will place the oven cavity 36″ or 42″ above the floor. 24″ MIN. 24″ MIN. 22 3/16″ 38″ 39″ 22″ TO 28″* 23 3/4″ 2 Runners on 11″ Centers Fig. 1 * SHOULD BE ADJUSTED TO SUIT BOTH STANDARD CABINETRY AND DESIRED OVEN WORKING HEIGHT. Oven 3/8″ MIN. Wall or Cabinet Fig. 2 The cabinet must have solid sides, back and bottom. The bottom must be solid either at floor level or with the bottom edge of the cutout. Any openings around the gas or electrical outlets must be sealed. All cabinet openings must be sealed at the time of installation to prevent drafts. Drafts will affect safe use of the oven. SPECIAL NOTES: • Make sure the oven is installed at the specified height. The unit has been tested and approved for installation, in accordance with safety standards at this height. • If the floor is to be the solid bottom, two runners, centered within the cutout opening 11″ apart may be used to support the oven. These runners must support 130 lbs. and must be level and straight. • The wall coverings, countertops and cabinets around the oven should be able to withstand temperatures of up to 200°F generated by the oven. IF YOU ARE REPLACING A UNIT THAT HAS A CUTOUT HEIGHT OF MORE THAN 38″: A Shut off the main gas supply before removing the existing oven. Leave the gas off until the new hookup is complete. B Measure how much your cutout height exceeds 38″. C Raise your gas inlet pipe if necessary. D Remove the storage drawer. E Extend the leg levelers (using a 3/16″ hex socket driver) by the amount measured in Step B. F Insert the oven into the cutout and adjust the levelers so that the oven racks are level and the top of the control panel overlaps the top of the cutout. 3/16″ Slotted Hex Head Fig. 3 Leg Leveler 3
-
 1
1 -
 2
2 -
 3
3 -
 4
4 -
 5
5 -
 6
6 -
 7
7 -
 8
8 -
 9
9 -
10
-
11
-
12
-
13
-
14
-
15
-
16
 |
 |
