GE JGRS06BEJBB Installation Instructions - Page 6
Warning - gas oven
 |
UPC - 084691098799
View all GE JGRS06BEJBB manuals
Add to My Manuals
Save this manual to your list of manuals |
Page 6 highlights
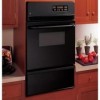
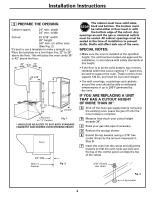
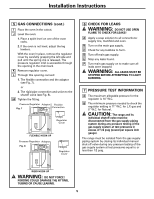
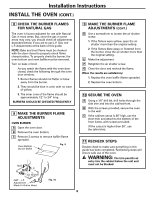
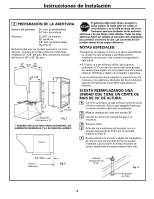
Installation Instructions INSTALL THE OVEN (CONT.) 8 CHECK THE BURNER FLAMES FOR NATURAL GAS The oven is factory-adjusted for use with Natural Gas in most areas. But, since the gas in some areas may vary, you should check all adjustments described below. If you are to use L.P. Gas, see L.P. Adjustments at the back of this guide. NOTE: Bake and broil flame must be checked with the door closed to properly check flame characteristics. To properly check the burner, the oven bottom and oven baffle must be removed. Turn on bake or broil. As you watch the flame with the oven door closed, check the following through the oven door window: 1. Burner flames should not flutter or blow away from the burner. 2. They should be blue in color with no trace of yellow. 3. The inner cone of the flame should be approximately 1/2″ to 3/4″ long. BURNERS SHOULD BE CHECKED FREQUENTLY 9 MAKE THE BURNER FLAME ADJUSTMENTS OVEN BURNER A Open the oven door. B Remove the oven bottom. C Remove 2 screws to remove baffle (flame spreader). Oven Bottom Burner Baffle Fig. 9 NAT. L.P. 9 MAKE THE BURNER FLAME ADJUSTMENTS (CONT.) D Use a screwdriver to loosen the air shutter screw. 1. If the flames were yellow, open the air shutter more than the original setting. 2. If the flames blew away or fluttered from the burner, close the air shutter more than the original setting. E Make the adjustment. F Retighten the air shutter screw. G Close the door and recheck the flame. When the results are satisfactory: 1. Replace the oven baffle (flame spreader). 2. Replace the oven bottom. 10 SECURE THE OVEN A Using a 1/8″ drill bit, drill holes through the side trim and into the cabinet front. B With the screws provided, secure the oven to the wall. C If the cabinet cutout is 38″ high, use the short trim and attach to the bottom of the front frame, with screws provided. (If the cutout is higher than 38″, use the taller trim). 11 RECHECK STEPS Double check to make sure everything in this guide has been completed. Rechecking steps will ensure safe use of the oven. WARNING: The trim permits air entry into the cabinet below the unit and must not be blocked. Air Shutter NAT. - L.P. Adjustment Made To Orifice Hood Fig. 10 6
-
 1
1 -
 2
2 -
 3
3 -
 4
4 -
 5
5 -
 6
6 -
 7
7 -
 8
8 -
 9
9 -
 10
10 -
 11
11 -
 12
12 -
13
-
14
-
15
-
16
 |
 |