GE JP201CBSS Use and Care Manual - Page 8
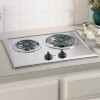
Control Knobs, Porcelain Enamel Cooktop, Stainless Steel Cooktop
 |
UPC - 084691798118
View all GE JP201CBSS manuals
Add to My Manuals
Save this manual to your list of manuals |
Page 8 highlights
Consumer Support Troubleshooting Tips Installation Instructions Care and Cleaning Operating Instructions Safety Instructions Care and cleaning of the cooktop. Be sure electrical power is off and all surfaces are cool before cleaning any part of the cooktop. Proper care and cleaning are important so your cooktop will give you efficient and satisfactory service. Follow these directions carefully in caring for your cooktop to assure safe and proper maintenance. Control Knobs The control knobs may be removed for easier cleaning. Make sure the knobs are in the OFF positions and pull them straight off the stems for cleaning. The knobs can be cleaned in a dishwasher or they may also be washed with soap and water. Make sure the inside of the knobs are dry before replacing. Replace the knobs in the OFF position to ensure proper placement. Porcelain Enamel Cooktop (on some models) The porcelain enamel finish is sturdy but breakable if misused. This finish is acid-resistant. However, any acid foods spilled (such as fruit juices, tomato or vinegar) should not be permitted to remain on the finish. For other spills such as fat spatterings, wash with soap and water or cleansing powders after the surface has cooled. Rinse well. Polish with a dry cloth. If acids spill on the cooktop while it is hot, use a dry paper towel or cloth to wipe it up right away. When the surface has cooled, wash with soap and water. Rinse well. Stainless Steel Cooktop (on some models) Do not use a steel wool pad; it will scratch the surface. To clean the stainless steel surface, use warm sudsy water or a stainless steel cleaner or polish. Always wipe the surface in the direction of the grain. Follow the cleaner instructions for cleaning the stainless steel surface. To inquire about purchasing stainless steel appliance cleaner or polish, or to find the location of a dealer nearest you, please call our toll-free number: National Parts Center 1.800.626.2002 ge.com 8
-
 1
1 -
2
-
 3
3 -
 4
4 -
 5
5 -
 6
6 -
 7
7 -
 8
8 -
 9
9 -
 10
10 -
 11
11 -
 12
12 -
 13
13 -
14
-
15
-
16
 |
 |
