GE JVM2052DNWW Installation Instructions - Page 13
Preparation of Top Cabinet, Attach Exhaust Damper, Mount the Microwave Oven
 |
UPC - 084691188070
View all GE JVM2052DNWW manuals
Add to My Manuals
Save this manual to your list of manuals |
Page 13 highlights
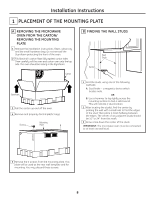
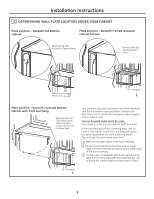
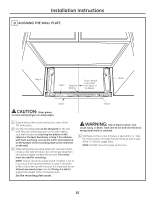
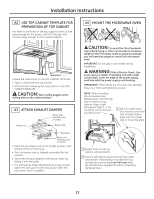
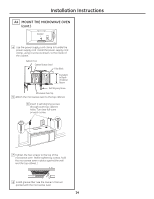
Installation Instructions A2 USE TOP CABINET TEMPLATE FOR PREPARATION OF TOP CABINET You need to drill holes for the top support screws, a hole large enough for the power cord to fit through, and a cutout large enough for the exhaust adaptor. • Read the instructions on the TOP CABINET TEMPLATE. • Tape it underneath the top cabinet. • Drill the holes, following the instructions on the TOP CABINET TEMPLATE. CAUTION: Wear safety goggles when drilling holes in the cabinet bottom. A3 ATTACH EXHAUST DAMPER Blower plate mounting screw (3 screws) Blower unit Blower plate Back plate Blower unit mounting screw (2 screws) • Place the microwave oven in its upright position, with the top of the unit facing up. • This microwave oven is shipped assembled for top exhaust . • Attach the exhaust adapter to the blower plate by sliding it into the guide. • You will need to make adjustments to ensure proper alignment with your house exhaust duct after the microwave oven is installed. A4 MOUNT THE MICROWAVE OVEN CAUTION: To avoid the risk of personal injury (back injury or other injuries due to excessive weight of the microwave oven) or property damage, you will need two people to install this microwave oven. IMPORTANT: Do not grip or use handle during installation. WARNING: Risk of Electric Shock. Can cause injury or death: If installing unit with metal countertops, cover the edge of the power supply cord hole with the power supply cord bushing. IMPORTANT: If filler blocks are not used, case damage may occur from overtightening screws. NOTE: When mounting the microwave oven, thread power cord through hole in bottom of top cabinet. Keep it tight throughout Steps 1-3. Do not pinch cord or lift oven by pulling cord. 1 Lift microwave oven, tilt it forward, and hook slots at back bottom edge onto four lower tabs of mounting plate. 2 Rotate front of oven up against cabinet bottom. 3 Insert a self-aligning screw through top-center cabinet hole. Temporarily secure the oven by turning the screw at least two full turns after the threads have engaged. (It will be completely tightened later.) 13
-
 1
1 -
2
-
3
-
4
-
5
-
6
-
7
-
 8
8 -
 9
9 -
 10
10 -
 11
11 -
 12
12 -
 13
13 -
 14
14 -
 15
15 -
 16
16 -
 17
17 -
 18
18 -
19
-
20
-
21
-
22
-
23
-
24
 |
 |
