GE NX-591E-GSM Instruction Manual - Page 13
Programming data
 |
UPC - 782136718904
View all GE NX-591E-GSM manuals
Add to My Manuals
Save this manual to your list of manuals |
Page 13 highlights
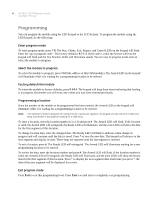
9 LCD keypad programming All steps required for programming are the same as those described for the LED keypad. The LCD keypad display will prompt you for the data required. While in programming mode, and not in a location, the number in parenthesis is the location you were previously changing. For example, if the display reads, "Enter location, then # (5)", it is reminding you that location 5 was the last location you programmed. Programming data Programming data is either numerical data, or feature selection data. Numerical data To program numerical data, enter a number from 0 to 255 on the numeric keys of the keypad. To view the data in a location, a binary process is used. With this process, the LEDs for zones 1 through 8 are used, and the numeric equivalents of their illuminated LEDs are added together to determine the data in a programming location. The numeric equivalents of these LEDs are as follows: Zone 1 LED = 1 Zone 2 LED = 2 Zone 3 LED = 4 Zone 4 LED = 8 Zone 5 LED = 16 Zone 6 LED = 32 Zone 7 LED = 64 Zone 8 LED = 128 For example, if the numerical data to be programmed in a location is "66", press 6 6 on the keypad. The LEDs for Zone 2 and Zone 7 will illuminate indicating 66 is in that location (2 + 64 = 66). Once the data is programmed, press * to enter the data and advance to the next segment of that location. After the last segment of a location is programmed, press * to exit that location, turn the Ready LED off, and the Armed LED on. You are now ready to enter another programming location. If an attempt is made to program a number too large for a particular segment, the keypad sounder will emit a triple beep, indicating an error, and remain in that segment waiting for a valid entry. Feature selection data Feature selection data will display the current condition (on or off) of eight features associated with the programming location and segment selected. Pressing a button on the touchpad (1 through 8) that corresponds to the feature number within a segment will toggle (on/off) that feature. Pressing any numeric key between 1 and 8 for selection of a feature will make the corresponding LED illuminate (feature on). Press the number again, and the LED will extinguish (feature off). You will see that numerous features can be selected from within one segment. For instance, if all eight features of a segment are desired, pressing 1 2 3 4 5 6 7 8 will turn on LEDs 1 through 8 as you press the keys, indicating that those features are enabled. Note: On LCD keypads, the numbers of the enabled features will be displayed. However, the features not enabled will display a hyphen (-). After you select the desired setting for this segment, press * to enter the data and automatically advance to the next segment of the location. When you are in the last segment of a location and press * to enter the data, you will exit that location. The Ready LED will turn off and the Armed LED will turn on. You are now ready to enter another programming location.
-
 1
1 -
2
-
3
-
4
-
5
-
6
-
7
-
 8
8 -
 9
9 -
 10
10 -
 11
11 -
 12
12 -
 13
13 -
 14
14 -
 15
15 -
 16
16 -
 17
17 -
 18
18 -
19
-
20
-
21
-
22
-
23
-
24
-
25
-
26
-
27
-
28
-
29
-
30
-
31
-
32
 |
 |
