GE PDWF2 Installation Instructions - Page 4
Installation, Preparation, Drain
 |
View all GE PDWF2 manuals
Add to My Manuals
Save this manual to your list of manuals |
Page 4 highlights
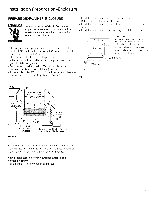
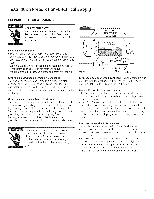
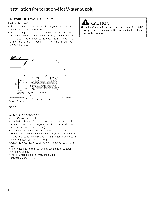
Installation Preparation-Drain PREPARE DRAIN PLUMBING Drain Requirements • Drain hose must not exceed 10 feet in length. • A high drain loop or air gap is required. See below. METHOD 1-Air Gap with Waste Tee or Disposer A A Drain Method The type of drain installation depends on the following: • Do local codes or ordinances require an air gap? • Is waste tee less than 18" above the floor? If the answer to either question is yes, an air gap must be used. Refer to Method 1 (Figure C) in the adjacent illustrations. If both answers are no, either an air gap or high drain loop may be used. Refer to Method 1 (Figure C) or Method 2 (Figure DI in the adjacent illustrations Note Drain hose elevation must not exceed 48". Waste Tee Installation Figure C Disposer Installation METHOD 2-High Drain Loop with Waste Tee or Disposer Use the drain hose hanger included in the installation kit to attach the drain hose to the underside of the countertop. Attachment will be made in a later step. Special consideration for a dishwasher installed on a elevated platform If the dishwasher is installed on an elevated platform, a high drain loop of at least 32" above the platform must be provided in addition to the air gap or drain loop requirement determined above. This is necessary for proper drain performance. 3Z' 18" Min Min. 32" Min 18" Min. Waste Tee Installation Figure D Disposer Installation Install waste tee or disposer and the air gap according to the manufacturer's instructions. ai A I ION An air gap MUST BE USED if the drain hose is connected to waste tee or disposer lower than 18" above the floor level. Failure to provide the proper drain connection height with an air gap or 32" minimum high drain loop will result in improper draining of the dishwasher, which may cause damage. Cabinet Preparation for drain line Drill a 1-1/2" diameter hole in the cabinet wall within the shaded area shown in Figure A for the drain hose. Make sure there are no sharp edges. The drain hose will be passed through this hole and connected to the drain in a later step. IMPORTANT -When connecting the drain line to a disposer, check to be sure that drain plug has been removed. Dishwasher will not drain if plug is left in place. Remove Drain Plug 4
-
 1
1 -
 2
2 -
 3
3 -
 4
4 -
 5
5 -
 6
6 -
 7
7 -
 8
8 -
 9
9 -
 10
10 -
11
-
12
-
13
-
14
-
15
-
16
 |
 |
