GE PSCS3RGXSS Use and Care Manual - Page 16
Care and Cleaning, Cleaning the Outside, Important Facts About Your Dispenser - refrigerator stainless steel
 |
UPC - 084691168119
View all GE PSCS3RGXSS manuals
Add to My Manuals
Save this manual to your list of manuals |
Page 16 highlights
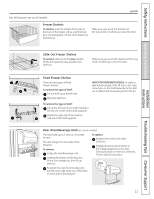
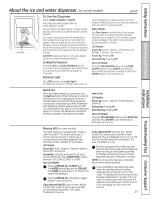
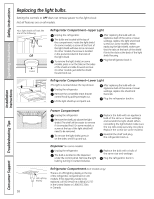
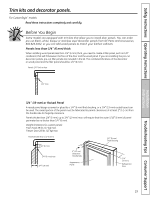
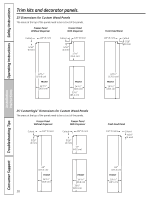
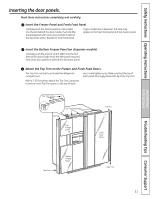
Operating Instructions Safety Instructions About the ice and water dispenser. (on some models) Important Facts About Your Dispenser s Do not add ice from trays or bags to the storage drawer. It may not crush or dispense well. s Avoid overfilling glass with ice and use of narrow glasses. Backed-up ice can jam the chute or cause the door in the chute to freeze shut. If ice is blocking the chute, poke it through with a wooden spoon. s Beverages and foods should not be quick-chilled in the ice storage drawer. Cans, bottles or food packages in the storage drawer may cause the icemaker or auger to jam. s To keep dispensed ice from missing the glass, put the glass close to, but not touching, the dispenser opening. s Some crushed ice may be dispensed even though you selected CUBED. This happens occasionally when a few cubes accidentally get directed to the crusher. s After crushed ice is dispensed, some water may drip from the chute. s Sometimes a small mound of snow will form on the door in the ice chute. This condition is normal and usually occurs when you have dispensed crushed ice repeatedly. The snow will eventually evaporate. Installation Instructions Care and cleaning of the refrigerator. Dispenser drip area. Cleaning the Outside The dispenser drip area, beneath the grille, should be wiped dry. Water left in this area may leave deposits. Remove the deposits by adding undiluted vinegar to the well. Soak until the deposits disappear or become loose enough to rinse away. The dispenser cradle. Before cleaning, lock the dispenser by pressing and holding the LOCK or LOCK CONTROLS pad for 3 seconds. Clean with warm water and baking soda solution-about a tablespoon (15 ml) of baking soda to a quart (1 liter) of water. Rinse thoroughly and wipe dry. The door handles and trim. Clean with a cloth dampened with soapy water. Dry with a soft cloth. The stainless steel panels and door handles (on some models) can be cleaned with a commercially available stainless steel cleaner. A spray-on stainless steel cleaner works best. Do not use appliance wax or polish on the stainless steel. Keep the outside clean. Wipe with a clean cloth lightly dampened with kitchen appliance wax or mild liquid dish detergent. Dry and polish with a clean, soft cloth. Do not wipe the refrigerator with a soiled dish cloth or wet towel. These may leave a residue that can erode the paint. Do not use scouring pads, powdered cleaners, bleach or cleaners containing bleach because these products can scratch and weaken the paint finish. Consumer Support Troubleshooting Tips Cleaning the Inside To help prevent odors, leave an open box of baking soda in the fresh food and freezer compartments. those that contain petroleum distillates, can crack or damage the interior of the refrigerator. Unplug the refrigerator before cleaning. If this is not practical, wring excess moisture out of sponge or cloth when cleaning around switches, lights or controls. Use warm water and baking soda solution- about a tablespoon (15 ml) of baking soda to a quart (1 liter) of water. This both cleans and neutralizes odors. Rinse and wipe dry. Avoid cleaning cold glass shelves with hot water because the extreme temperature difference may cause them to break. Handle glass shelves carefully. Bumping tempered glass can cause it to shatter. Do not wash any plastic refrigerator parts in the dishwasher. Use of any cleaning solution other than The chill/thaw tray is dishwasher safe. 16 that which is recommended, especially
-
 1
1 -
2
-
3
-
4
-
5
-
6
-
7
-
8
-
9
-
10
-
 11
11 -
 12
12 -
 13
13 -
 14
14 -
 15
15 -
 16
16 -
 17
17 -
 18
18 -
 19
19 -
 20
20 -
 21
21 -
22
-
23
-
24
-
25
-
26
-
27
-
28
-
29
-
30
-
31
-
32
-
33
-
34
-
35
-
36
-
37
-
38
-
39
-
40
-
41
-
42
-
43
-
44
-
45
-
46
-
47
-
48
-
49
-
50
-
51
-
52
-
53
-
54
-
55
-
56
-
57
-
58
-
59
-
60
-
61
-
62
-
63
-
64
-
65
-
66
-
67
-
68
-
69
-
70
-
71
-
72
-
73
-
74
-
75
-
76
-
77
-
78
-
79
-
80
-
81
-
82
-
83
-
84
-
85
-
86
-
87
-
88
-
89
-
90
-
91
-
92
-
93
-
94
-
95
-
96
-
97
-
98
-
99
-
100
-
101
-
102
-
103
-
104
-
105
-
106
-
107
-
108
-
109
-
110
-
111
-
112
-
113
-
114
-
115
-
116
-
117
-
118
-
119
-
120
-
121
-
122
-
123
-
124
-
125
-
126
-
127
-
128
-
129
-
130
-
131
-
132
 |
 |