Genie DirectLift Owner's Manual - Page 9
Nstall - keypad instructions
 |
View all Genie DirectLift manuals
Add to My Manuals
Save this manual to your list of manuals |
Page 9 highlights
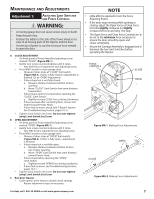
WARNING: A moving garage door may cause serious injury or death. • Keep people clear of opening while door is moving. • Do not allow children to play with the Remote Controls. If the Safety Reverse does not work properly: • Close the door and disconnect the Opener using the Emergency Release Cord. • Do not use the door Opener, Remote Controls, or Wireless Keypad. • Refer to the door and door Opener Owner's Manuals before attempting any repairs. Remote Control Operation A Press Button on Remote Control. Garage door will move. B Press Button again. Garage door will stop: • The door automatically stops at the end of the open or close cycle. C Press Button again. Garage door will reverse. Install Light Bulbs and Lens A Install two 60 Watt light bulbs (not included) into Light Sockets (Figure MA-6): • Rough service, 130 Volt bulbs are recommended. B Hold the lens, with the bottom hinges pointing up, against the power head metal front cover (Figure MA-7). • Insert (2) #8-32 x 3/8" Phillips Hex Head Screws through the Bottom hinges and into holes provided in metal front cover of Power Head (Figure MA-7). Tighten screws Flip Lens up and fasten with (2) #8-32 x 3/8" Phillips Pan Head Screws where indicated. WARNING: Use the Wall Console included with Opener. Any other wall console can cause the Opener to operate unexpectedly and the light to stop working. Figure MA-6 1 Button Compact Remote 3 Button Compact Remote w/Docking Station w/Docking Station Figure MA-4 Genie Remote Controls 1234 FiFgiugruerMe 1A3-5LeLaeranrnCCooddeeBuButttotonnanadndInIdndiciactaotroLr iLgihgtht To program a Homelink® or Car2U Device: (This GDO is Homelink® and Car2U compatible) • Follow the Homelink® or Car2U instructions in your car owner's manual. Figure MA-7 For Help, call 1-800-35-GENIE or visit www.geniecompany.com 9
-
 1
1 -
2
-
3
-
 4
4 -
 5
5 -
 6
6 -
 7
7 -
 8
8 -
 9
9 -
 10
10 -
 11
11 -
 12
12 -
 13
13 -
 14
14
 |
 |
