Gigabyte 7VM400AM-RZ User Manual - Page 12
Step 4: Install AGP Card, Step 5: Install I/O Peripherals Cables
 |
View all Gigabyte 7VM400AM-RZ manuals
Add to My Manuals
Save this manual to your list of manuals |
Page 12 highlights
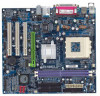
English Step 4: Install AGP Card 1. Read the relate AGP card's instruction document before install the AGP card into the computer. 2. If your AGP card has "AGP 4X/8X(1.5V) notch"(show below), please make sure your AGP card is AGP 4X/8X(1.5V). AGP 4X/8X notch 3. Please carefully pull out the small white-drawable bar at the end of the AGP slot when you try to install/ uninstall the AGP card. Please align the AGP card to the onboard AGP slot and press firmly down on the slot. Make sure your AGP card is locked by the small white-drawable bar. Step 5: Install I/O Peripherals Cables Step 5-1: I/O Back Panel Introduction X Z ] _ Y [ \^ ` a X PS/2 Keyboard and PS/2 Mouse connector This connector supports standard PS/2 keyboard and PS/2 mouse. Y/^ USB port Before you connect your device(s) into USB connector(s), please make sure your device(s) such as USB keyboard, mouse, scanner, zip, speaker...etc. Have a standard USB interface. Also make sure your OS supports USB controller. If your OS does not support USB controller, please contact OS vendor for possible patch or driver upgrade. For more information please contact your OS or device(s) vendors. Z Parallel port (LPT) Device like printer can be connected to Parallel port. [ Serial port (COMA) Mouse and modem etc. can be connected to Serial port. \ VGA port Monitor can be connected to VGA port. ] LAN port LAN is fast Ethernet with 10/100Mbps speed. _ Line In jack Devices like CD-ROM, walkman etc. can be connected to Line In jack. 7VM400AM-RZ Motherboard - 12 -
-
 1
1 -
2
-
3
-
4
-
5
-
6
-
 7
7 -
 8
8 -
 9
9 -
 10
10 -
 11
11 -
 12
12 -
 13
13 -
 14
14 -
 15
15 -
 16
16 -
 17
17 -
18
-
19
-
20
-
21
-
22
-
23
-
24
-
25
-
26
-
27
-
28
-
29
-
30
-
31
-
32
-
33
-
34
-
35
-
36
-
37
-
38
-
39
-
40
 |
 |
