Gigabyte 7VM400AM-RZ User Manual - Page 13
Step 5-2: Connectors Introduction
 |
View all Gigabyte 7VM400AM-RZ manuals
Add to My Manuals
Save this manual to your list of manuals |
Page 13 highlights
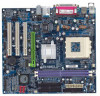
English ` Line Out jack Connect the stereo speakers or earphone to this connector. a MIC In jack Microphone can be connect to MIC In jack. After installation of the audio driver, you are able to use 2/4/6-channel audio feature by software selection. You can connect "Front speaker" to "Line Out" jack, Connect "Rear speaker" to "Line In" jack and connect "Center/Subwoofer" to "MIC In" jack. Step 5-2: Connectors Introduction 2 1 9 12 10 1) ATX 2) CPU_FAN 3) SYS_FAN 4) FDD 5) IDE1 / IDE2 6) SATA0/SAT1 7) PWR_LED 8) F_PANEL 9) F_AUDIO 4 5 3 16 17 6 18 11 13 14 15 7 8 10) SUR_CEN 11) SPDIF 12) CD_IN 13) COMB 14) GAME 15) F_USB1 / F_USB2 16) CLR_CMOS 17) CI 18) BAT - 13 - Hardware Installation Process
-
 1
1 -
2
-
3
-
4
-
5
-
6
-
7
-
 8
8 -
 9
9 -
 10
10 -
 11
11 -
 12
12 -
 13
13 -
 14
14 -
 15
15 -
 16
16 -
 17
17 -
 18
18 -
19
-
20
-
21
-
22
-
23
-
24
-
25
-
26
-
27
-
28
-
29
-
30
-
31
-
32
-
33
-
34
-
35
-
36
-
37
-
38
-
39
-
40
 |
 |

- 13 -
Hardware Installation Process
English
Step 5-2: Connectors Introduction
1)
ATX
2)
CPU_FAN
3)
SYS_FAN
4)
FDD
5)
IDE1 / IDE2
6)
SATA0/SAT1
7)
PWR_LED
8)
F_PANEL
9)
F_AUDIO
10)
SUR_CEN
11)
SPDIF
12)
CD_IN
13)
COMB
14)
GAME
15)
F_USB1 / F_USB2
16)
CLR_CMOS
17)
CI
18)
BAT
Line Out jack
Connect the stereo speakers or earphone to this connector.
MIC In jack
Microphone can be connect to MIC In jack.
After installation of the audio driver, you are able to use 2/4/6-channel audio feature by software
selection. You can connect "Front speaker" to "Line Out" jack, Connect "Rear speaker" to "Line In"
jack and connect "Center/Subwoofer" to "MIC In" jack.
4
5
1
3
9
7
14
16
13
11
15
12
8
2
10
18
6
17