Gigabyte GA-3CESL3-RH Manual - Page 11
Installation Step
 |
View all Gigabyte GA-3CESL3-RH manuals
Add to My Manuals
Save this manual to your list of manuals |
Page 11 highlights
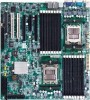
Hardware Installation Process Installation Step: Step 1 Insert the DIMM memory module vertically into the DIMM slot, and push it down. Step 2 Close the plastic clip at both edges of theDIMM slots to lock the DIMM module. NOTE!! DIMM must be populated in order starting from B1/A1 DIMM sockets. Each logical DIMM must be made of two identical DIMMs having the same device size on each and the same DIMM size. Step 3 Reverse the installation steps when you wish to remove the DIMM module. 1 2 2 11
-
 1
1 -
2
-
3
-
4
-
5
-
 6
6 -
 7
7 -
 8
8 -
 9
9 -
 10
10 -
 11
11 -
 12
12 -
 13
13 -
 14
14 -
 15
15 -
 16
16 -
17
-
18
-
19
-
20
-
21
-
22
-
23
-
24
-
25
-
26
-
27
-
28
-
29
-
30
-
31
-
32
-
33
-
34
-
35
-
36
-
37
-
38
-
39
-
40
-
41
-
42
-
43
-
44
-
45
-
46
-
47
-
48
-
49
-
50
-
51
-
52
-
53
-
54
-
55
-
56
-
57
-
58
-
59
-
60
-
61
-
62
-
63
-
64
 |
 |

11
Hardware Installation Process
Installation Step:
Step 1
Insert the DIMM memory module vertically into the DIMM slot, and push it down.
Step 2
Close the plastic clip at both edges of theDIMM slots to lock the DIMM module.
NOTE!!
DIMM must be populated in order starting from B1/A1 DIMM sockets. Each logical DIMM
must be made of two identical DIMMs having the same device size on each and the same
DIMM size.
Step 3
Reverse the installation steps when you wish to remove the DIMM module.
2
2
1