Gigabyte GA-HA65M-UD3H-B3 Manual - Page 89
C. Rebuilding an Array, Enabling Automatic Rebuild, Spare Management
 |
View all Gigabyte GA-HA65M-UD3H-B3 manuals
Add to My Manuals
Save this manual to your list of manuals |
Page 89 highlights
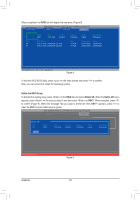
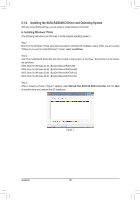
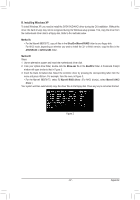
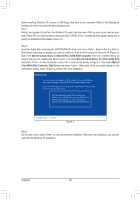
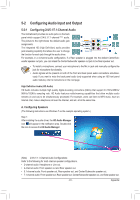
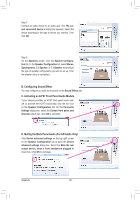
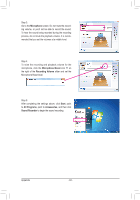
C. Rebuilding an Array Rebuilding is the process of restoring data to a hard drive from other drives in the array. Rebuilding applies only to fault-tolerant arrays such as RAID 1 array. The procedures below assume a new drive is added to replace a failed drive to rebuild a RAID 1 array. (Note: The new drive must have equal or greater capacity than the old one.) Turn off your computer and replace the failed hard drive with a new one. Restart your computer. To enable an automatic rebuild in the operating system, you have to set the new hard drive as a Spare drive in the RAID setup utility first. • Enabling Automatic Rebuild Step 1: When the message "Press + to enter BIOS Setup or to continue" appears, press + to enter the RAID setup utility. On the main screen, press on the RAID tab and then press on Spare Management. [ Selection] Marvell BIOS Setup (c) 2009 Marvell Technology Group Ltd. [ Adapter] [ Devices] [ RAID ] RAID Config Create VD Delete VD Wipe out disk Spare Management ENTER/SPACE: Select, ESC: Back/Exit Step 2: The new hard drive will be displayed on the screen. Press or on the new hard drive to select it and then press on NEXT. When prompted, press to confirm. The new hard drive is now set as a Spare drive. Marvell BIOS Setup (c) 2009 Marvell Technology Group Ltd. [ Selection] [ Adapter] [ Devices] [ RAID ] Spare Management Port Disk Name * S0 SATA: WDC WD800JD-22LSA0 Size 76.3GB RAID Config Max Speed Status SATA 3Gb/s FREE NEXT ENTER/SPACE: Select, ESC: Back/Exit - 89 - Appendix
-
 1
1 -
2
-
3
-
4
-
5
-
6
-
7
-
8
-
9
-
10
-
11
-
12
-
13
-
14
-
15
-
16
-
17
-
18
-
19
-
20
-
21
-
22
-
23
-
24
-
25
-
26
-
27
-
28
-
29
-
30
-
31
-
32
-
33
-
34
-
35
-
36
-
37
-
38
-
39
-
40
-
41
-
42
-
43
-
44
-
45
-
46
-
47
-
48
-
49
-
50
-
51
-
52
-
53
-
54
-
55
-
56
-
57
-
58
-
59
-
60
-
61
-
62
-
63
-
64
-
65
-
66
-
67
-
68
-
69
-
70
-
71
-
72
-
73
-
74
-
75
-
76
-
77
-
78
-
79
-
80
-
81
-
82
-
83
-
 84
84 -
 85
85 -
 86
86 -
 87
87 -
 88
88 -
 89
89 -
 90
90 -
 91
91 -
 92
92 -
 93
93 -
 94
94 -
95
-
96
-
97
-
98
-
99
-
100
-
101
-
102
-
103
-
104
 |
 |
