Gigabyte GA-M720-US3 Manual - Page 75
Installing the SATA RAID Driver and Operating System
 |
View all Gigabyte GA-M720-US3 manuals
Add to My Manuals
Save this manual to your list of manuals |
Page 75 highlights
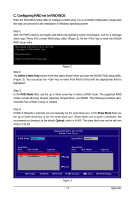
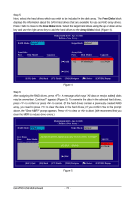
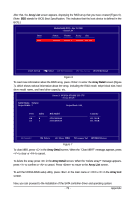
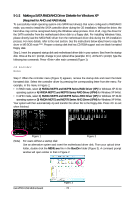
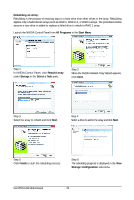
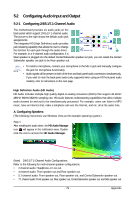
5-1-3 Installing the SATA RAID Driver and Operating System With the SATA RAID driver diskette and correct BIOS settings, you are ready to install Windows operating system onto your hard drives. A. Installing Windows XP Step 1: Restart your system to boot from the Windows XP setup disk and press as soon as you see the message "Press F6 if you need to install a 3rd party SCSI or RAID driver" (Figure 1). A screen will then appear asking you to specify additional device. Insert the floppy disk containing the SATA RAID driver and press and a screen similar to that in Figure 2 will appear. Windows Setup Step 2: Press F6 if you need to install a third party SCSI or RAID driver. Figure 1 The screen displays two drivers, both of which need to be installed. First select NVIDIA RAID Driver and press . On the next screen, press to return to the screen in Figure 2. Then select NVIDIA nForce Storage Controller and press . When both of the two drivers appear on the confirmation screen, press to continue the driver installation. When completed, proceed with the Windows XP installation. Windows Setup You have chosen to configure a SCSI Adapter for use with Windows, using a device support disk provided by an adapter manufacturer. Select the SCSI Adapter you want from the following list, or press ESC to return to the previous screen. NVIDIA RAID Driver (required) NVIDIA nForce Storage Controller (required) ENTER=Select F3=Exit Figure 2 - 75 - Appendix
-
 1
1 -
2
-
3
-
4
-
5
-
6
-
7
-
8
-
9
-
10
-
11
-
12
-
13
-
14
-
15
-
16
-
17
-
18
-
19
-
20
-
21
-
22
-
23
-
24
-
25
-
26
-
27
-
28
-
29
-
30
-
31
-
32
-
33
-
34
-
35
-
36
-
37
-
38
-
39
-
40
-
41
-
42
-
43
-
44
-
45
-
46
-
47
-
48
-
49
-
50
-
51
-
52
-
53
-
54
-
55
-
56
-
57
-
58
-
59
-
60
-
61
-
62
-
63
-
64
-
65
-
66
-
67
-
68
-
69
-
 70
70 -
 71
71 -
 72
72 -
 73
73 -
 74
74 -
 75
75 -
 76
76 -
 77
77 -
 78
78 -
 79
79 -
 80
80 -
81
-
82
-
83
-
84
-
85
-
86
-
87
-
88
-
89
-
90
-
91
-
92
-
93
-
94
-
95
-
96
 |
 |