Gigabyte GA-Q57M-S2H Manual - Page 75
Smart TPM, A. Before installing Smart TPM, follow the steps below in sequence
 |
View all Gigabyte GA-Q57M-S2H manuals
Add to My Manuals
Save this manual to your list of manuals |
Page 75 highlights
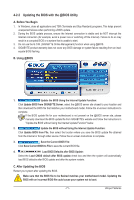
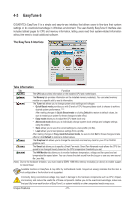
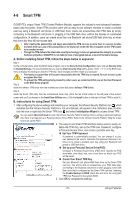
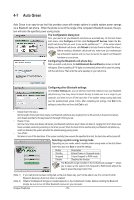
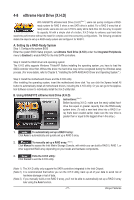
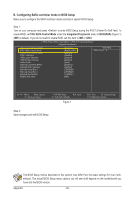
4-6 Smart TPM GIGABYTE's unique Smart TPM (Trusted Platform Module) supports the industry's most advanced hardwarebased data encryption. Smart TPM provides users with an easy-to-use software interface to create a portable user key using a Bluetooth cell phone or USB flash drive. Users can access/close their PSD data by simply connecting to the Bluetooth cell phone or plugging in the USB flash drive, without the hassles of complicated configurations. In addition, users can create more than one Bluetooth cell phone/USB flash drive key, so when they lost a key they still can access data. • After creating the password(s) and key(s) associated the TPM, be sure to store them in a secure location and back them up. Loss of the password(s) or the key(s) will render the files encrypted via the TPM unable to be cracked or read. • Though the TPM delivers the latest data security technology, it does not guarantee data integrity or provide hardware protection. GIGABYTE is not liable for loss of encrypted data as a result of hardware damage. A. Before installing Smart TPM, follow the steps below in sequence: Step 1: As the computer starts, enter the BIOS Setup program. Go to the Security Chip Configuration menu and set Security Chip to Enabled/Activate. It's recommended that you use the Clear Security Chip setting (press + in the BIOS main menu to display this setting) to clear the TPM chip. Save changes and then restart your computer. • Previously encrypted files will become inaccessible after the TPM chip is cleared. Be sure to back up the encrypted files first. • To prevent the TPM settings being cleared by other users, we recommend that you set the User Password Step 2: in the BIOS Setup program. Install the Infineon TPM driver from the motherboard driver disk (select Infineon TPM Driver). Step 3: Install the Smart TPM utility from the motherboard driver disk. (Click the tab at the bottom of the left pane of the autorun screen and you'll be directed to the Install New Utilities menu. Click the Install button on the right of Smart TPM to install it.) B. Instructions for using Smart TPM: 1. After configuring the above settings and restarting your computer, the Infineon Security Platform icon , which indicates that the Infineon Security Platform is not yet initialized, will appear in the notification area. Doubleclick the icon or right-click the Smart TPM icon and select Initialization Wizard to access Smart TPM. You can select Advanced mode to enter the Infineon Security Platform Settings Tool to configure advanced settings. (You have to at least set up a Personal Secure Drive (PSD). Refer to the Infineon Security Platform Help file to see how to set up the PSD.) 2. The easy-to-use Smart TPM interface allows users to easily initialize the TPM chip, set up the TPM User Password, configure a Personal Secure Drive, and create a portable user key. Set Your TPM Password A password is automatically provided. You can change it to your own password. Be sure to memorize this password because it allows you to create a portable user key using your Bluetooth cell phone or USB flash drive. Set up your Personal Secure Drive(PSD) Configure a Personal Secure Drive (PSD) here. Specify the PSD drive letter, drive label, size, and a local drive on which your PSD will be saved. Create Your Smart TPM Key Set your Bluetooth cell phone/USB flash drive as the Smart TPM user key. You will be able to access/close your PSD data when connecting to the Bluetooth cell phone or when plugging in the USB flash drive that is configured as the Smart TPM user key. Selecting the Enable Backup to BIOS check box will store the encrypted TPM User Password in the system BIOS. 3. Click OK to complete the settings. - 75 - Unique Features
-
 1
1 -
2
-
3
-
4
-
5
-
6
-
7
-
8
-
9
-
10
-
11
-
12
-
13
-
14
-
15
-
16
-
17
-
18
-
19
-
20
-
21
-
22
-
23
-
24
-
25
-
26
-
27
-
28
-
29
-
30
-
31
-
32
-
33
-
34
-
35
-
36
-
37
-
38
-
39
-
40
-
41
-
42
-
43
-
44
-
45
-
46
-
47
-
48
-
49
-
50
-
51
-
52
-
53
-
54
-
55
-
56
-
57
-
58
-
59
-
60
-
61
-
62
-
63
-
64
-
65
-
66
-
67
-
68
-
69
-
 70
70 -
 71
71 -
 72
72 -
 73
73 -
 74
74 -
 75
75 -
 76
76 -
 77
77 -
 78
78 -
 79
79 -
 80
80 -
81
-
82
-
83
-
84
-
85
-
86
-
87
-
88
-
89
-
90
-
91
-
92
-
93
-
94
-
95
-
96
-
97
-
98
-
99
-
100
-
101
-
102
-
103
-
104
-
105
-
106
-
107
-
108
-
109
-
110
-
111
-
112
 |
 |