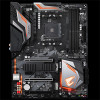
Gigabyte X470 AORUS ULTRA GAMING User Manual - Page 17
SATA3 0/1/2/3/4/5 SATA 6Gb/s Connectors, M2A_SOCKET/M2B_SOCKET M.2 Socket 3 Connectors - pcie 4 0
 |
View all Gigabyte X470 AORUS ULTRA GAMING manuals
Add to My Manuals
Save this manual to your list of manuals |
Page 17 highlights
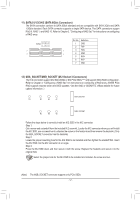
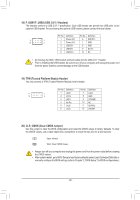
S_ _ B _S _U S__ _B B USB_3 UF _ B USB3 F S S F 11) SATA3 0/1/2/3/4/5 (SATA 6Gb/s Connectors) The SATA connectors conform to SATA 6Gb/s standard and are compatible with SATA 3Gb/s and SATA 1.5Gb/s standard. Each SATA connector supports a single SATA device. The SATA connectors support RAID 0, RAID 1, and RAID 10. ReferFto Chapter 3, "Configuring a RAID Set," for instructions on configuring a RAID array. _0 G.QBOFM SATA3 0 2 4 135 G.QBOFM G.QBOFPMin No. Definition 1 GND 2 TXP 7 _0 1 3 TXN 7 _F 1 4 GND 5 RXN 6 RXP 7 GND _F _0 F 12) M2A_SOCKET/M2B_SOCKET (M.2 Socket 3 Connectors) The M.2 connectors support M.2 SATA SSDs or M.2 PCIe SSDs (Note) and support SATA RAID configuration. Refer to Chapter 3, "Configuring a RAID Set," for instructions on configuring a RAID array. (NVME PCIe RAID support requires driver an_d0 BIOFS updates. Visit the AMD or GIGABYTE official website for future update information. ) 110 80 60 42 M2A_SOCKET 80 60 42 M2B_SOCKET _3 U Follow the steps below to correctly install an M.2 SSD in the M.2 connector. Step 1: Get a screw and a standoff from the included M.2 screw kit. Locate the M.2 connector where you will install the M.2 SSD, use a screwdriver to unfasten the screw on the heatsink and then remove the heatsink. (Only the M2A_SOCKET connect_o3r has thUe heatsink) Step 2: Locate the proper mounting hole for the M.2 SSD to be installed and then tighten the standoff first. Insert the M.2 SSD into the M.2 connector at an angle. Step 3: Press the M.2 SSD down and then secure it with the screw. Replace the heatsink and secure it to the original hole. Select the proper hole for the M.2 SSD to be installed and refasten the screw and nut. (Note) The M2B_SOCKET connector supports only PCIe SSDs. - 17 -
-
 1
1 -
2
-
3
-
4
-
5
-
6
-
7
-
8
-
9
-
10
-
11
-
 12
12 -
 13
13 -
 14
14 -
 15
15 -
 16
16 -
 17
17 -
 18
18 -
 19
19 -
 20
20 -
 21
21 -
 22
22 -
23
-
24
-
25
-
26
-
27
-
28
-
29
-
30
-
31
-
32
-
33
-
34
-
35
-
36
-
37
-
38
-
39
-
40
-
41
-
42
-
43
-
44
 |
 |
